Running ComfyUI on Hyperstack
Generate images with ComfyUI and FLUX.1-schnell on a GPU virtual machine, through an SSH tunnel and the ComfyUI HTTP API.
ComfyUI is an open-source, node-based application for building image generation workflows. Running it on a GPU virtual machine gives you your own models and custom nodes on a dedicated GPU, with the web interface kept private behind an SSH tunnel.
This tutorial walks through deploying a GPU virtual machine, installing ComfyUI, downloading the FLUX.1-schnell model, and generating an image in the ComfyUI interface. It also covers generating images through the ComfyUI HTTP API and adding custom nodes.
To generate images without managing a virtual machine, use the Image Playground in AI Studio, which also gives you an API-ready request for each generation. This tutorial is for running ComfyUI node workflows, your own checkpoints, and custom nodes on your own GPU.
Step 1: Deploy a GPU virtual machine
Choose a GPU flavor with enough VRAM for the models you plan to run. This tutorial uses FLUX.1-schnell, a 12 billion parameter model. While generating a 1024 by 1024 image, its FP8 checkpoint used about 17 GB of VRAM in testing on the 1x L40 flavor and about 28 GB on the 1x A100-80G-PCIe flavor. Usage differs between GPUs, so treat these figures as observations, not minimums. Larger models, higher resolutions, and video workflows need more. Choose a flavor with headroom, and confirm usage with nvidia-smi on your own virtual machine.
If this is your first time deploying a virtual machine on Hyperstack, see the getting started guide for more detail on each option in the deploy form.
-
In Hyperstack, navigate to the Virtual Machines page and click Deploy New Virtual Machine.
-
Select an in-stock GPU flavor with enough VRAM for your models. See flavors for the VRAM of each GPU. This tutorial was tested on the 1-GPU
L40andA100-80G-PCIeflavors, and the examples below use theL40. -
Select an environment in a region where the flavor is available, or click Create New Environment to create one. The form marks environments that are not compatible with the selected flavor.
-
Under Select OS Image, select the Ubuntu tile, then select Server 24.04 LTS R570 CUDA 12.8 from its dropdown. This image ships the NVIDIA driver and the CUDA toolkit, so PyTorch can reach the GPU without further setup.
-
Select an existing SSH key, or click Create New SSH Key to add one. In the dialog, generate a new key pair or import an existing public key. A generated key downloads its private key file to your computer, so note the path for Step 2. See Create an SSH key for both options.
-
Enable the SSH Access and Assign Public IP toggles so you can connect to the virtual machine over SSH. You do not open any other port. ComfyUI is reached through an SSH tunnel in Step 5.
-
Click Deploy. The virtual machine reaches the
ACTIVEstate in a few minutes.
Some flavors include a large ephemeral drive (725 GB on the L40 flavor), mounted at /ephemeral. The FP8 checkpoint is about 17 GB and fits on the root disk, so this tutorial uses the root disk. See Step 4 if you want to keep a larger collection of models on the ephemeral drive.
With the virtual machine ACTIVE, connect to it over SSH to install ComfyUI.
Step 2: Connect to the virtual machine
Run the local commands in this tutorial in a macOS or Linux terminal. On Windows, use Windows Subsystem for Linux (WSL).
-
Find the virtual machine's public IP in the PUBLIC IP column on the Virtual Machines page.
-
If you downloaded the private key from the console, restrict its permissions before using it:
terminalSet key permissionschmod 400 <path-to-ssh-key> -
Connect to the virtual machine. Replace
<path-to-ssh-key>with your private key path and<vm-ip-address>with the public IP:terminalSSH into the virtual machinessh -i <path-to-ssh-key> ubuntu@<vm-ip-address>Confirm the GPU is visible:
terminalCheck the GPU and drivernvidia-smiThe output lists the GPU and the driver version. On this image it shows a 570-series driver and
CUDA Version: 12.8.
You now have a shell on the virtual machine. Next, install ComfyUI.
Step 3: Install ComfyUI
Install ComfyUI from source into a Python virtual environment. This tutorial was tested with ComfyUI 0.46.0. Run every command in this step as the ubuntu user. Do not use sudo with pip.
-
Install the Python virtual environment package. The image does not include it, and the package index needs a refresh first:
terminalInstall python3-venvsudo apt-get update
sudo apt-get install -y python3-venv -
Clone ComfyUI and create a virtual environment inside it:
terminalClone ComfyUI and create a virtual environmentgit clone https://github.com/Comfy-Org/ComfyUI.git
cd ComfyUI
python3 -m venv venv
source venv/bin/activateYour prompt now starts with
(venv). Keep this shell open for the rest of the tutorial. If you open a new SSH session, runcd ~/ComfyUI && source venv/bin/activateagain. -
Install PyTorch built for CUDA 12.8, the CUDA version of the image's driver:
terminalInstall PyTorch for CUDA 12.8pip install torch torchvision torchaudio --index-url https://download.pytorch.org/whl/cu128The
cu128build matches the image's R570 driver. If you installed thecu130build from the ComfyUI installation guide instead, see the troubleshooting entry. -
Install the ComfyUI requirements:
terminalInstall ComfyUI requirementspip install -r requirements.txt -
Confirm PyTorch can use the GPU:
terminalCheck PyTorch and the GPUpython -c "import torch; print(torch.__version__, torch.cuda.is_available(), torch.cuda.get_device_name(0))"The output shows the PyTorch version,
True, and your GPU name. On theL40flavor:Expected output2.11.0+cu128 True NVIDIA L40
With ComfyUI installed, download the model.
Step 4: Download the FLUX.1-schnell model
ComfyUI loads image models from models/checkpoints. This tutorial uses the FP8 checkpoint of FLUX.1-schnell that the Comfy Org team repackages for ComfyUI. It bundles the text encoders and the VAE in one file, so there is nothing else to download.
-
Download the checkpoint into the ComfyUI checkpoints folder:
terminalDownload the FLUX.1-schnell FP8 checkpointcurl -fL -o models/checkpoints/flux1-schnell-fp8.safetensors \
https://huggingface.co/Comfy-Org/Flux-1-Schnell/resolve/main/flux1-schnell-fp8.safetensorsThe file is about 17 GB, so the download takes a few minutes.
-
Confirm the file is in place:
terminalList the checkpoints folderls -lh models/checkpoints/Expected outputtotal 17G
-rw-rw-r-- 1 ubuntu ubuntu 17G Nov 19 15:24 flux1-schnell-fp8.safetensors
-rw-rw-r-- 1 ubuntu ubuntu 0 Nov 19 15:18 put_checkpoints_here
Review the license on the FLUX.1-schnell model card before you use the model or the images it generates commercially. The same applies to any other model you download.
If your flavor has an ephemeral drive and you plan to keep several large models, store them there and link the folder into ComfyUI. The /ephemeral directory is owned by root, so create your own folder and take ownership of it first:
sudo mkdir -p /ephemeral/models/checkpoints
sudo chown -R ubuntu:ubuntu /ephemeral/models
Move the checkpoint you downloaded to the ephemeral drive, then replace the ComfyUI checkpoints folder with a link to it:
mv ~/ComfyUI/models/checkpoints/* /ephemeral/models/checkpoints/
rmdir ~/ComfyUI/models/checkpoints
ln -s /ephemeral/models/checkpoints ~/ComfyUI/models/checkpoints
The ephemeral drive is cleared when you hibernate or delete the virtual machine, so you download the models again after a restore. After a restore, run the Create a model folder on the ephemeral drive commands again before you download the models. The link in the ComfyUI folder is on the root disk, so it is still in place. See How to Save Ephemeral Data.
With the model downloaded, start ComfyUI and open it over an SSH tunnel.
Step 5: Open ComfyUI over an SSH tunnel
ComfyUI listens on port 8188 of the virtual machine's local address, 127.0.0.1, by default. Only processes on the virtual machine can reach it, so it is not reachable from the internet and the virtual machine needs no firewall rule for it. An SSH tunnel forwards that port to your local machine, and your browser and scripts reach ComfyUI at localhost:8188.
-
In your SSH session on the virtual machine, start ComfyUI from the
ComfyUIfolder with the virtual environment active:terminalStart ComfyUIpython main.pyWhen the server is ready, the last log line ends with:
Expected outputTo see the GUI go to: http://127.0.0.1:8188Keep this SSH session open while you use ComfyUI. ComfyUI stops if the session closes.
-
Open a new terminal on your local machine, not inside the SSH session. Execute the following command to forward local port 8188 to the virtual machine. The command prints nothing and keeps running. Keep this terminal open while you use ComfyUI:
terminalForward the ComfyUI port to your local machinessh -i <path-to-ssh-key> -N -L 8188:localhost:8188 ubuntu@<vm-ip-address> -
In your local browser, open http://localhost:8188. The ComfyUI interface loads.
ComfyUI has no login. Anyone who can reach its port can run workflows on your GPU and read the files it writes. Do not start it with --listen and do not open port 8188 in the virtual machine's firewall. Reach it through the SSH tunnel only.
With ComfyUI open, generate your first image.
Step 6: Generate your first image
ComfyUI ships workflow templates, so you do not build the node graph by hand. The Flux.1 Schnell FP8 template loads the checkpoint you downloaded and wires it to a ready-to-run text-to-image graph.
-
The first time you open ComfyUI, the Templates dialog opens automatically. Otherwise, click Templates in the ComfyUI sidebar on the left.
-
Enter
flux schnellin the search box, then click the Flux.1 Schnell FP8 template: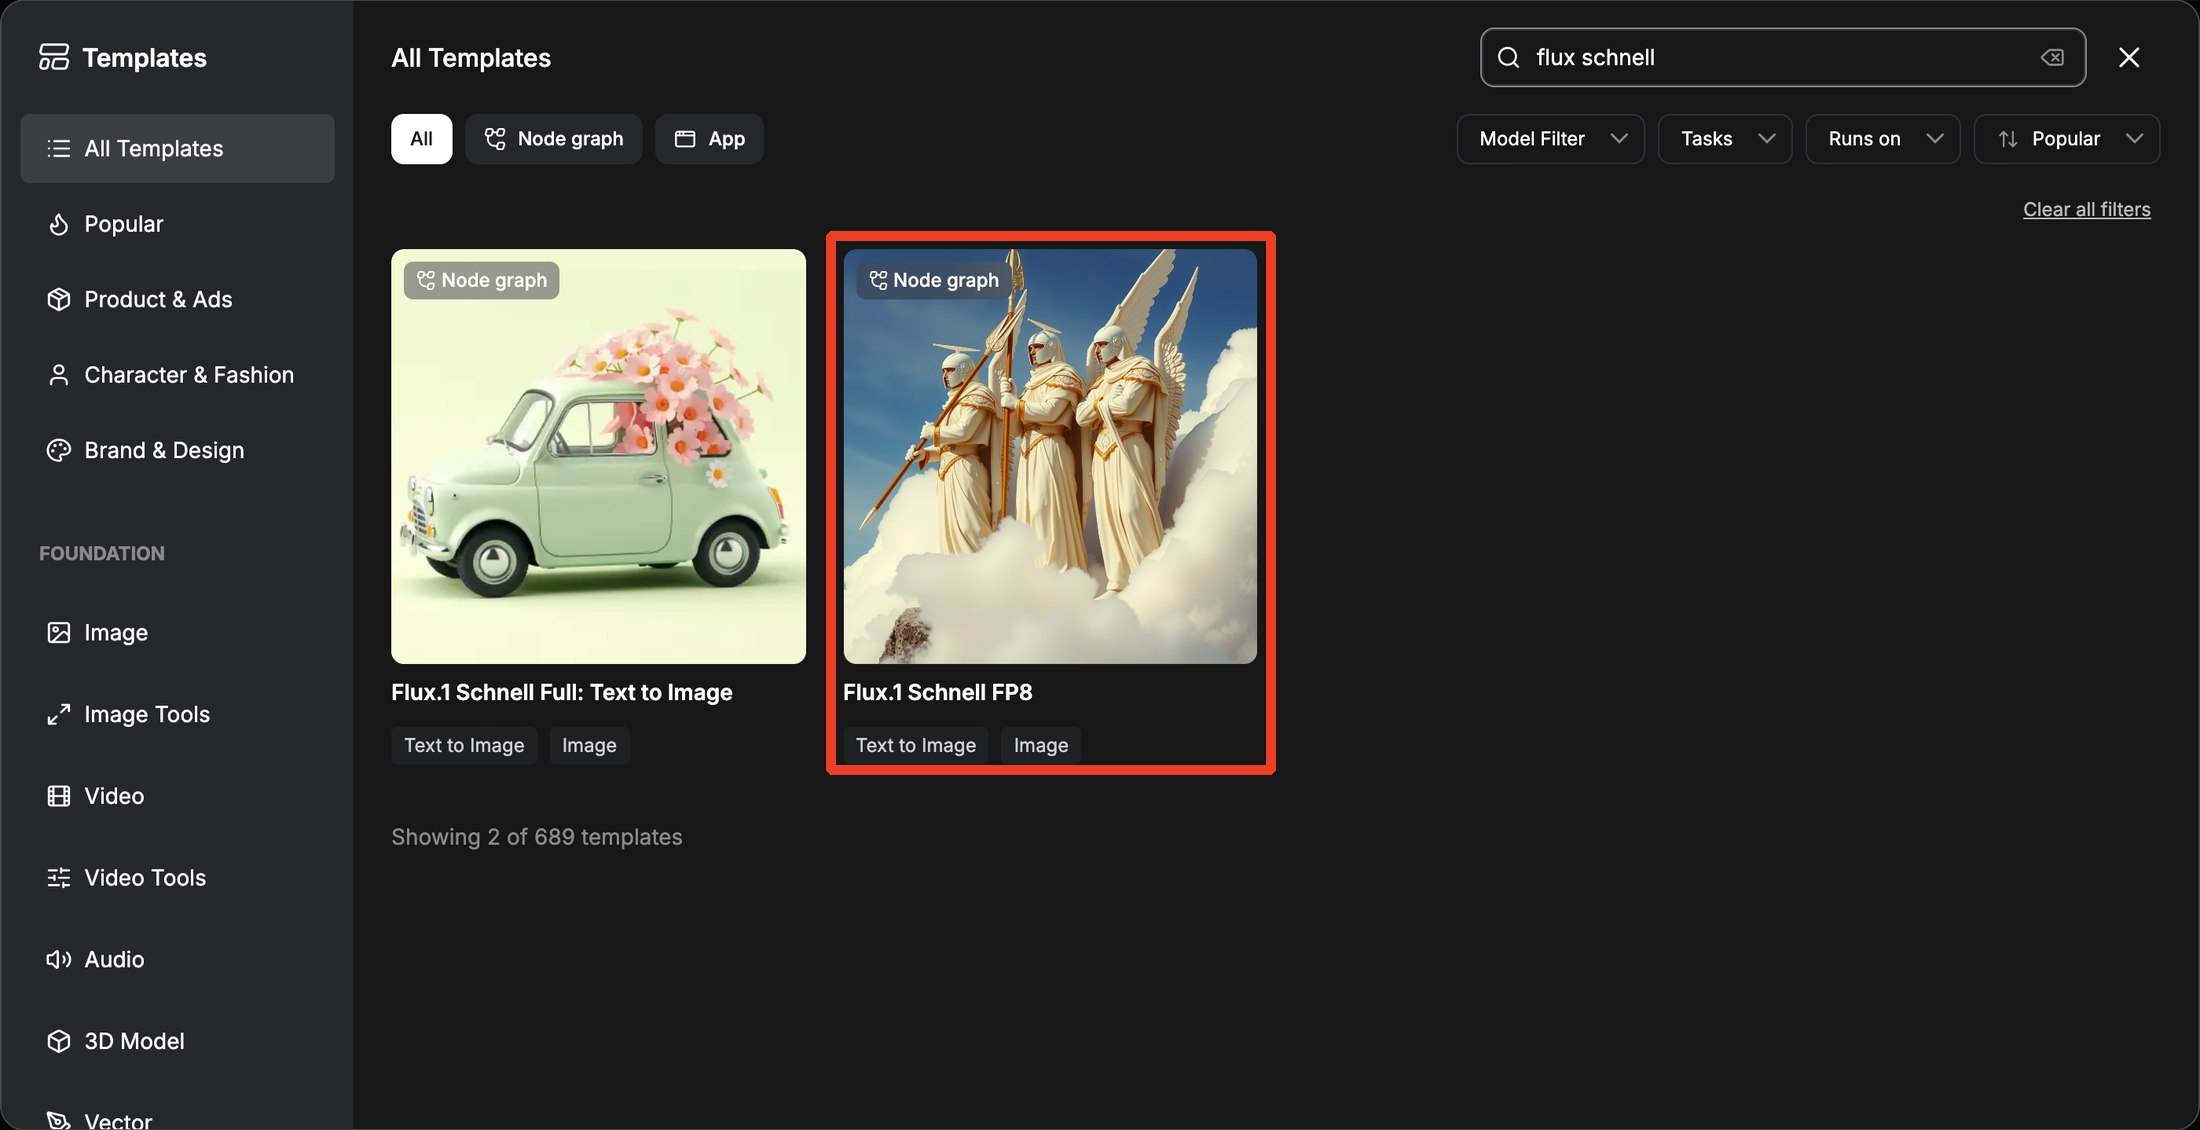
The workflow opens on the canvas, and the Load Checkpoint node shows
flux1-schnell-fp8.safetensors. -
Optionally, replace the text in the CLIP Text Encode (Positive Prompt) node with your own prompt.
-
Click Run. The first run loads the model into GPU memory, so it takes longer than later runs. When the run finishes, the image appears in the Save Image node:
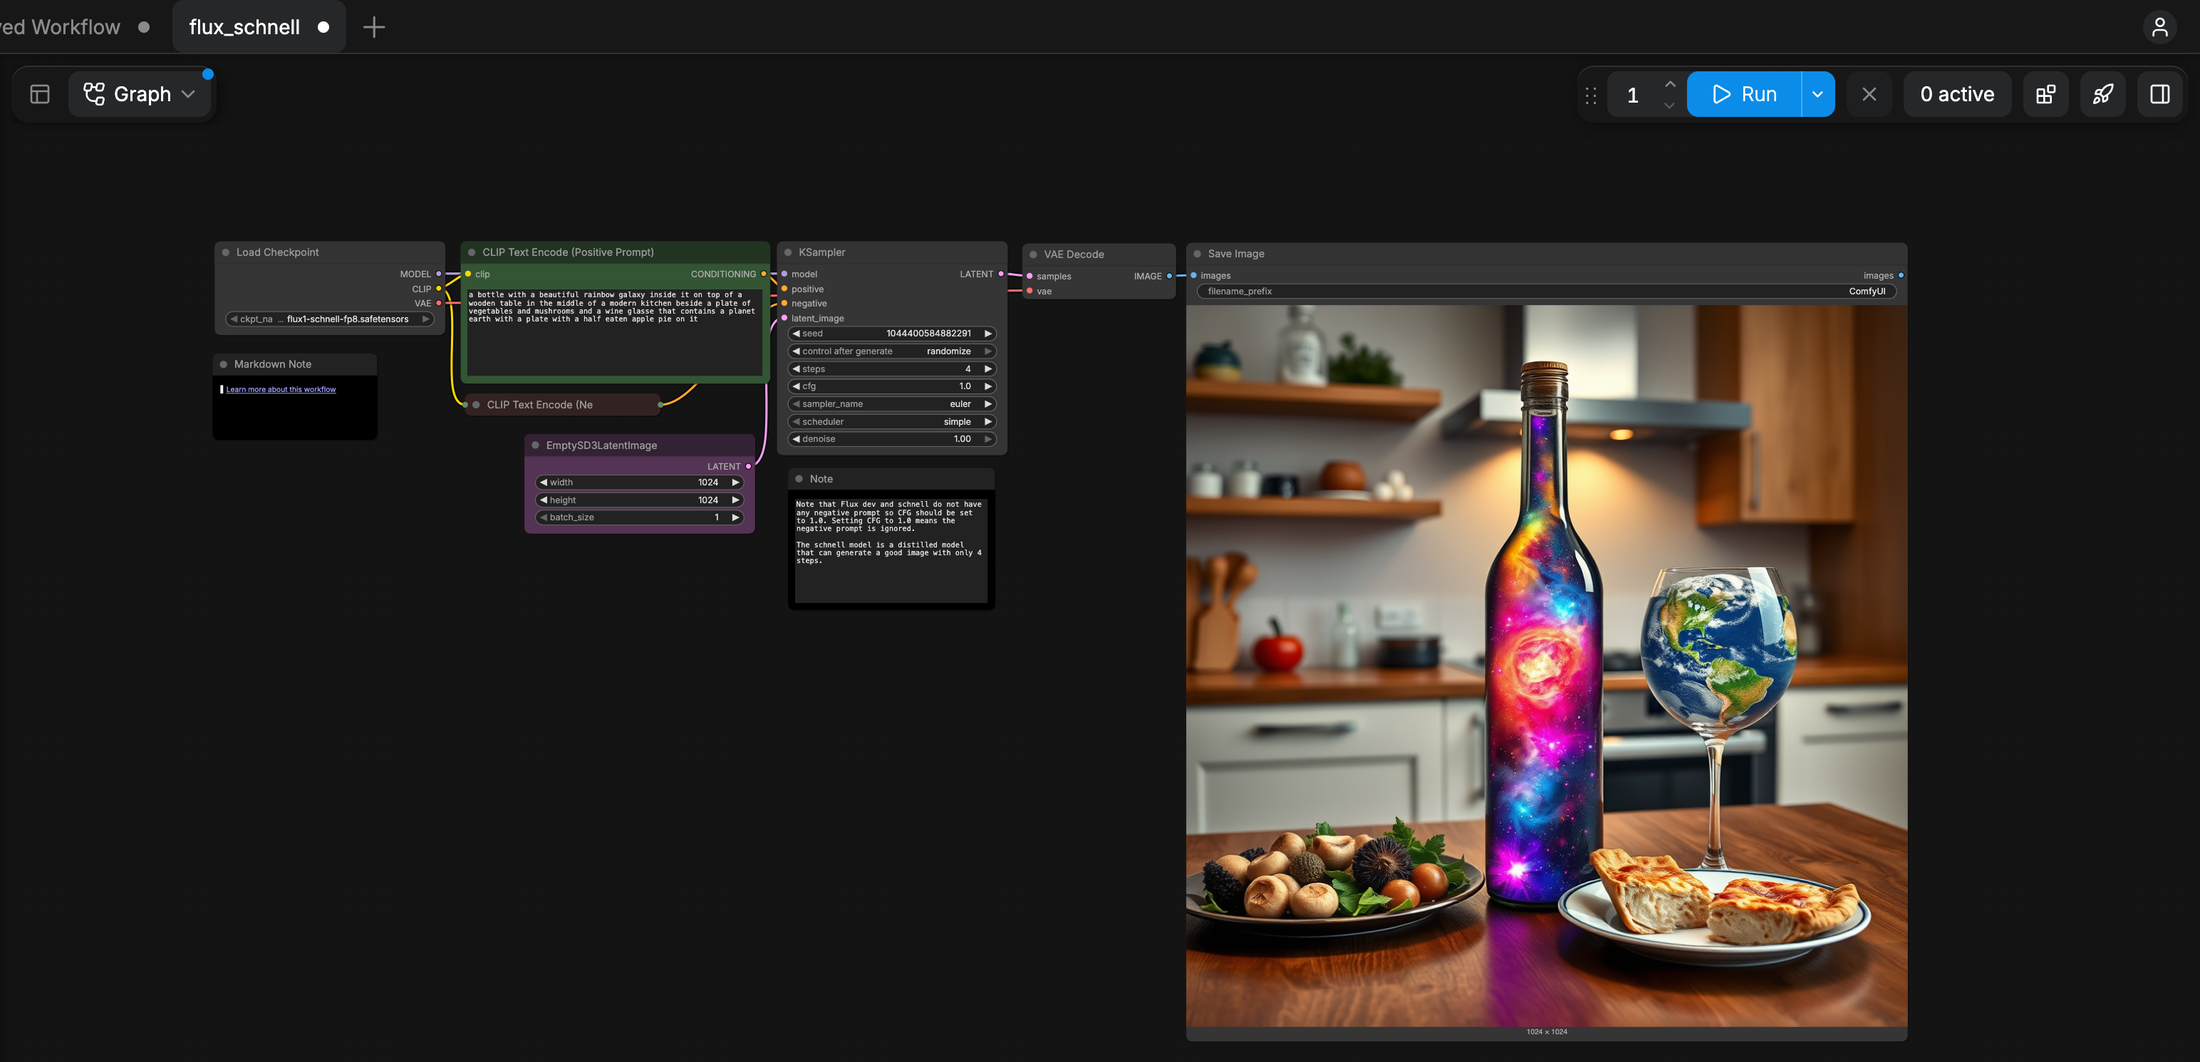
In testing, the first run took about 14 seconds on an
L40and about 11 seconds on anA100-80G-PCIe. ComfyUI saves each image to~/ComfyUI/outputon the virtual machine.
The template sets 4 steps and a cfg of 1.0, the settings FLUX.1-schnell is distilled for. The model does not use a negative prompt, so the second CLIP Text Encode node stays empty.
From here, you can generate images from your own scripts through the API, or add custom nodes with ComfyUI-Manager.
Generate images through the API
Every workflow you run in the interface is a JSON graph that ComfyUI also accepts over HTTP. You submit a graph to POST /prompt, poll GET /history/{prompt_id} until it completes, and download the image from GET /view. The requests below go through the same SSH tunnel, so keep the tunnel terminal from Step 5 open.
-
In a terminal on your local machine, save the workflow as an API-format JSON file. This file describes a graph equivalent to the template, with the model, prompt, seed, image size, 4 steps, and a
SaveImagenode that writes files starting withapi:terminalSave the workflow filecat > workflow_api.json << 'EOF'
{
"prompt": {
"1": {
"class_type": "CheckpointLoaderSimple",
"inputs": { "ckpt_name": "flux1-schnell-fp8.safetensors" }
},
"2": {
"class_type": "CLIPTextEncode",
"inputs": {
"text": "a lighthouse on a rocky coast at sunrise, golden light, detailed",
"clip": ["1", 1]
}
},
"3": {
"class_type": "CLIPTextEncode",
"inputs": { "text": "", "clip": ["1", 1] }
},
"4": {
"class_type": "EmptySD3LatentImage",
"inputs": { "width": 1024, "height": 1024, "batch_size": 1 }
},
"5": {
"class_type": "KSampler",
"inputs": {
"model": ["1", 0],
"positive": ["2", 0],
"negative": ["3", 0],
"latent_image": ["4", 0],
"seed": 42,
"steps": 4,
"cfg": 1.0,
"sampler_name": "euler",
"scheduler": "simple",
"denoise": 1.0
}
},
"6": {
"class_type": "VAEDecode",
"inputs": { "samples": ["5", 0], "vae": ["1", 2] }
},
"7": {
"class_type": "SaveImage",
"inputs": { "images": ["6", 0], "filename_prefix": "api" }
}
}
}
EOFEach key is a node ID. A value such as
["1", 1]connects an input to output 1 of node 1. To get this JSON for a workflow you built in the interface, click the ComfyUI logo at the top left, then click File and Export (API):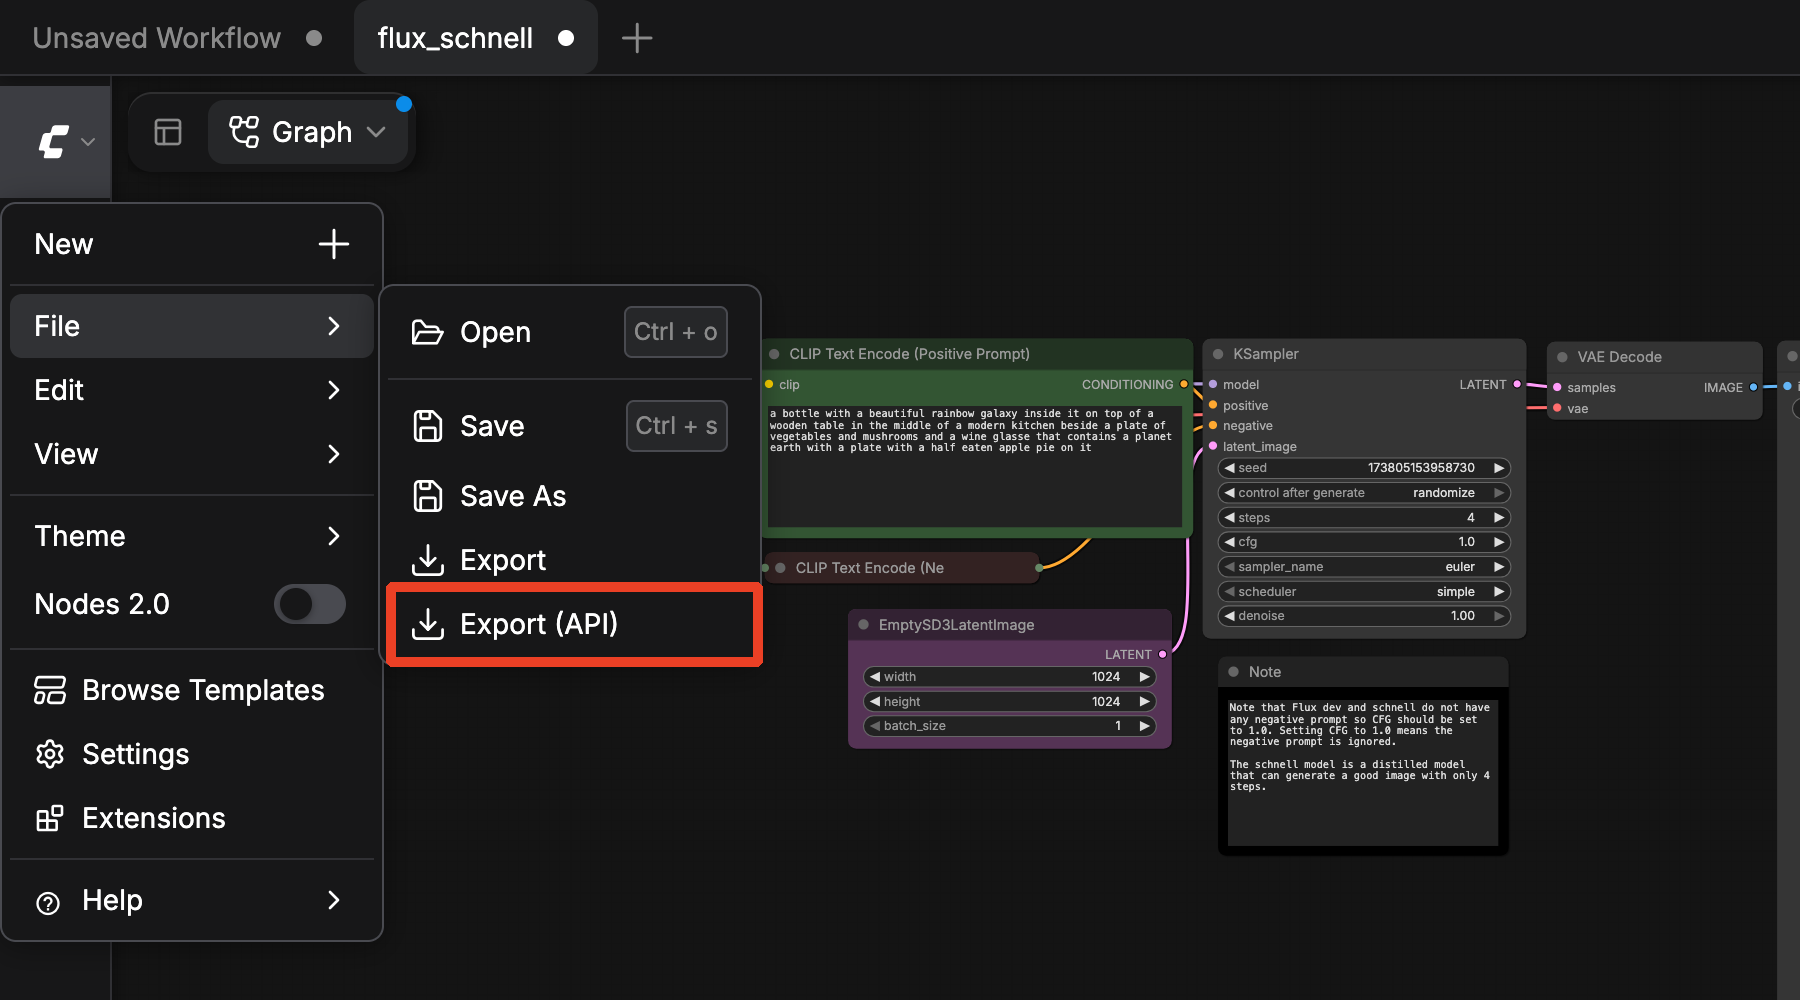
The downloaded file holds the node map without the top-level
"prompt"key. Add the key with jq, replacing<exported-file>.jsonwith the downloaded file:terminalWrap an exported workflow for the APIjq '{prompt: .}' <exported-file>.json > workflow_api.json -
Submit the workflow to the queue. The response contains the
prompt_idthat identifies your job:terminalSubmit the workflowcurl -s http://localhost:8188/prompt \
-H "Content-Type: application/json" \
-d @workflow_api.jsonjsonExample response{"prompt_id": "def3f0a6-3e57-4314-8fec-8defd5cc6078", "number": 0, "node_errors": {}} -
Poll the history for your job. Replace
<prompt-id>with the value from the previous response. The response is an empty{}while the job runs, and it lists the output files when the job completes:terminalCheck the jobcurl -s http://localhost:8188/history/<prompt-id>The completed response includes the saved file under the
SaveImagenode ID:jsonExample output section"outputs": {"7": {"images": [{"filename": "api_00001_.png", "subfolder": "", "type": "output", "metadata": {"kind": "image", "width": 1024, "height": 1024}}]}} -
Download the image with the
filename,subfolder, andtypevalues from the history:terminalDownload the imagecurl -s "http://localhost:8188/view?filename=api_00001_.png&subfolder=&type=output" -o lighthouse.pngOpen
lighthouse.pngto see the result. To generate another image, changeseedor the prompt and submit the workflow again. ComfyUI returns the previous result for a graph it has already run with identical inputs.
You can script these three requests from any language. ComfyUI also streams progress over a WebSocket at /ws, which this tutorial does not use.
Add custom nodes with ComfyUI-Manager
ComfyUI-Manager installs custom node packs from the ComfyUI interface. Custom nodes are Python code that runs on your virtual machine with the same permissions as ComfyUI, so install only packs you trust.
-
In your SSH session, stop ComfyUI with Ctrl+C, then install the Manager and start ComfyUI with the Manager enabled:
terminalEnable ComfyUI-Managerpip install -r manager_requirements.txt
python main.py --enable-manager -
Reload
http://localhost:8188in your browser. Click the ComfyUI logo at the top left, then click Extensions. The Nodes Manager opens, with lists such as All Extensions, Not Installed, and Missing Nodes, which shows the node packs that the open workflow needs. -
Search for a node pack by name, then click its Install button. When the install finishes, a toggle replaces the button and ComfyUI shows a message to restart:
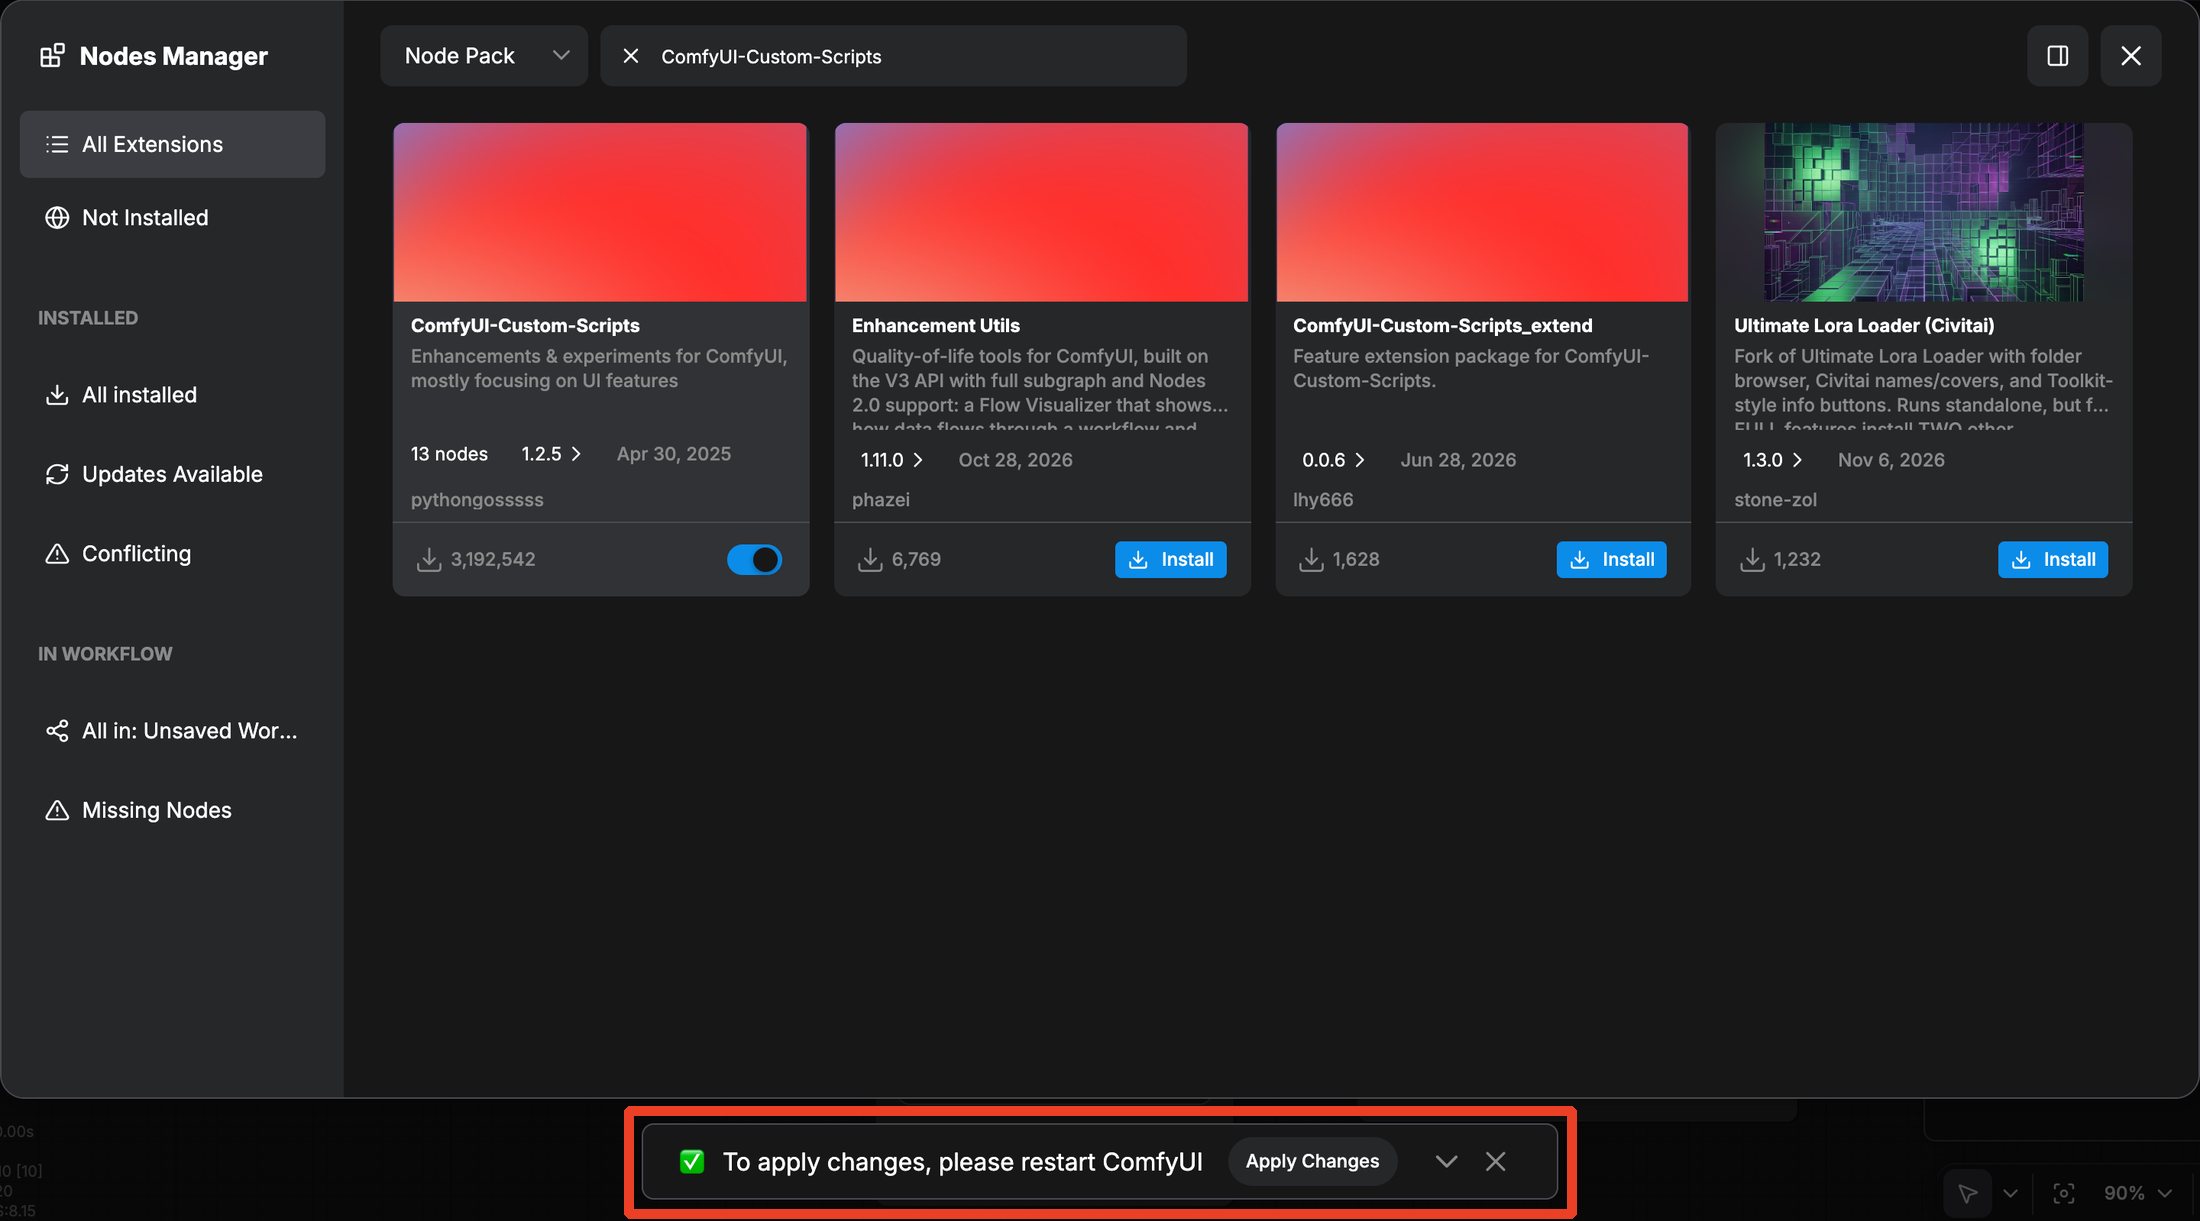
-
In your SSH session, stop ComfyUI with Ctrl+C and start it again with the same command:
terminalRestart ComfyUI with the Manager enabledpython main.py --enable-managerThe startup log lists the new pack under
Import times for custom nodes. Reloadhttp://localhost:8188in your browser to use its nodes.
When you're finished
Virtual machines bill in the ACTIVE and SHUTOFF states, so stopping a virtual machine does not stop its charges. When you are finished, you can hibernate the virtual machine to pause billing for its compute resources, or delete it to stop all charges. Hibernation does not preserve everything:
- The root disk persists through hibernation and is removed only when you delete the virtual machine. The ComfyUI folder, the model, and the images in
~/ComfyUI/outputsurvive hibernation but are lost when you delete the virtual machine. - The ephemeral drive (
/ephemeral) is cleared on both hibernation and deletion. Anything you stored there is gone.
Before you delete the virtual machine, copy the images and workflows you want to keep to persistent storage, such as a Shared Storage Volume, or download them to your local machine. See How to Save Ephemeral Data and VM Status and State Management.
After a restore, start ComfyUI again and reopen the SSH tunnel. Use the virtual machine's current public IP, which changes after a restore unless you kept the public IP attached when you hibernated. Restoring also requires the flavor to be in stock. See Restoration and Hardware Availability.
Troubleshooting
Find solutions to common issues you might hit while following this tutorial. Select an issue to expand its solution:
python3 -m venv fails with ensurepip is not available
python3 -m venv fails with ensurepip is not availableThe image does not include the Python virtual environment package. Install it as shown in Step 3, then delete the partial environment and create it again with rm -rf venv and python3 -m venv venv. If apt-get install fails with 404 Not Found or Unable to fetch some archives, the package index is out of date. Execute sudo apt-get update first, then install python3-venv.
PyTorch reports The NVIDIA driver on your system is too old
The NVIDIA driver on your system is too oldYou installed a PyTorch build for a newer CUDA version than the image's driver supports. The cu130 index in the ComfyUI installation guide installs such a build, and torch.cuda.is_available() returns False with the message The NVIDIA driver on your system is too old (found version 12080). The Ubuntu Server 24.04 LTS R570 CUDA 12.8 image needs the cu128 build.
Running the cu128 install command again does not replace the installed build, because pip reports the requirement as already satisfied. Delete the virtual environment and recreate it, then repeat the PyTorch and requirements installs from Step 3:
deactivate
cd ~/ComfyUI
rm -rf venv
python3 -m venv venv
source venv/bin/activate
The API returns Value not in list for ckpt_name
Value not in list for ckpt_nameThe ckpt_name in your workflow does not match a file in ~/ComfyUI/models/checkpoints. The error lists the files ComfyUI found, such as ckpt_name: 'nope.safetensors' not in ['flux1-schnell-fp8.safetensors']. Execute ls ~/ComfyUI/models/checkpoints on the virtual machine and use the exact file name. If the folder is empty, repeat the download in Step 4.
The API returns Node '...' not found
Node '...' not foundThe workflow uses a node type that your ComfyUI installation does not have. The error reads Node 'Nope' not found. The custom node may not be installed. Workflows you download from the internet often use custom node packs. Install the pack, for example through ComfyUI-Manager, or build the workflow from core nodes.
mkdir fails with Permission denied under /ephemeral
mkdir fails with Permission denied under /ephemeralThe /ephemeral directory is owned by root. Create your folder with sudo and take ownership of it, as shown in Step 4:
sudo mkdir -p /ephemeral/models/checkpoints
sudo chown -R ubuntu:ubuntu /ephemeral/models
You cannot reach localhost:8188 from your local machine
localhost:8188 from your local machineTest the connection from your local machine with curl http://localhost:8188. The error tells you which part is missing. Failed to connect to localhost port 8188 means the SSH tunnel is not running. Run the tunnel command from Step 5 again and keep that terminal open. Connection reset by peer means the tunnel is up but ComfyUI is not running on the virtual machine. Start it again with python main.py from the ComfyUI folder with the virtual environment active.