Running Jupyter Notebook
Run GPU-accelerated Jupyter Notebooks in your browser, installed automatically when you deploy a virtual machine.
Run GPU-accelerated Jupyter Notebooks in your browser within minutes. When you deploy a virtual machine on Hyperstack, you can have a Jupyter Notebook server installed and configured automatically, with no manual setup required. Jupyter Notebook is an interactive computing environment for creating and sharing documents that combine live code, equations, visualizations, and narrative text.
This tutorial walks through deploying a virtual machine with Jupyter Notebook pre-installed, connecting to the notebook server, and running your first GPU-accelerated notebook.
Step 1: Deploy a Virtual Machine with Jupyter Notebook
-
Open the deployment page
In the Hyperstack console, navigate to Virtual Machines in the sidebar under Cloud, then click Deploy New Virtual Machine.
-
Select a GPU flavor
Choose the flavor that matches your workload. For an interactive notebook environment, a single-GPU flavor such as 1x RTX-A6000 is a cost-effective starting point.
Choose a GPU flavor for GPU workloadsThe Jupyter Notebook server itself runs on any flavor, but your notebooks can only use a GPU if the virtual machine has one. Select a GPU flavor if you plan to run GPU-accelerated code.
-
Select an environment
Choose the environment in which to deploy your virtual machine. Each environment belongs to a region, so the list only offers environments compatible with your selected flavor.
-
Choose an OS image
Select an Ubuntu image that includes the NVIDIA driver and CUDA, such as Server 22.04 LTS R535 CUDA 12.2.
Use an image with the NVIDIA driver and CUDAThe automatic Jupyter Notebook installation requires an image that includes the NVIDIA driver and CUDA, such as Ubuntu Server 22.04 LTS R535 CUDA 12.2. On plain OS images without the NVIDIA driver, the Jupyter Notebook server will not start.
-
Select an SSH key
Choose an SSH key for the virtual machine. You access Jupyter Notebook through your browser, but an SSH key is required for every virtual machine and lets you administer the server from the command line if needed.
Optionally, enable the SSH Access toggle to allow incoming SSH traffic on port 22.
-
Assign a public IP address
Enable the Assign Public IP toggle. A public IP address is required to reach the Jupyter Notebook server over the internet on port 8888.
-
Enable automatic Jupyter Notebook installation
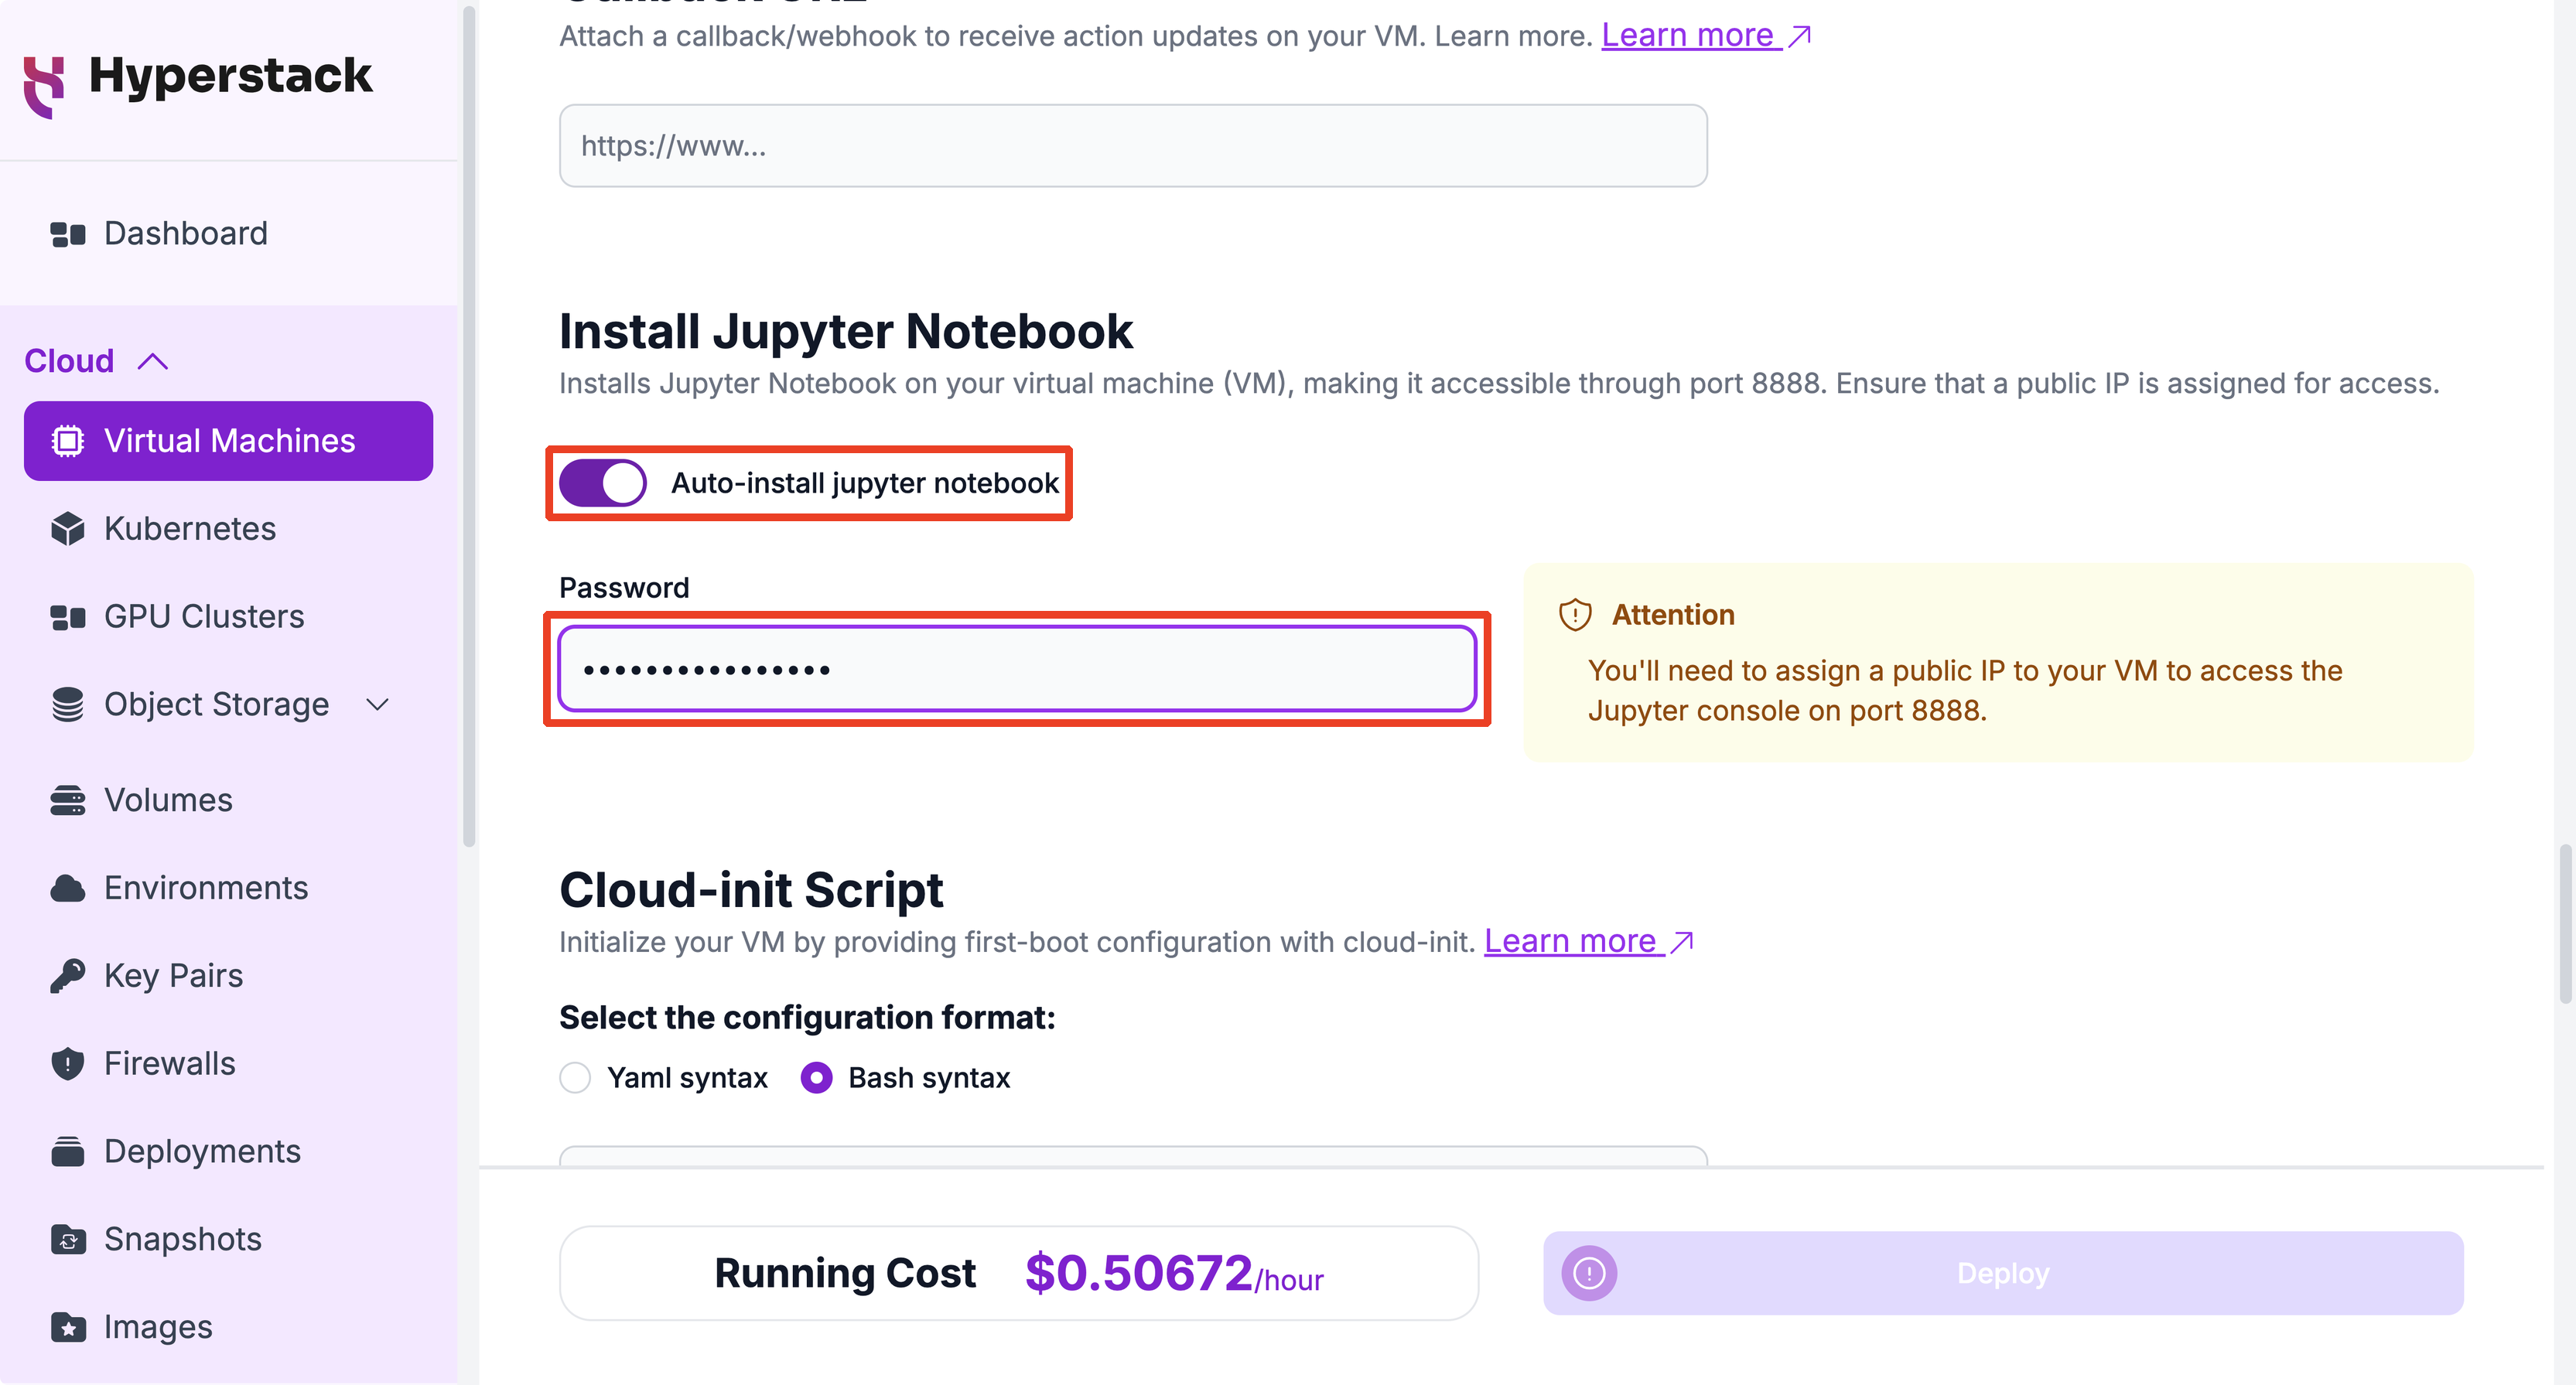
Click Configure Additional Settings and scroll to the Install Jupyter Notebook section. Enable the Auto-install jupyter notebook toggle, then enter a Password of your choice. This password is used to log in to the Jupyter Notebook server in your browser.
-
Deploy the virtual machine
Review the configuration and price breakdown, then click Deploy.
When the virtual machine is created, a firewall rule allowing inbound traffic on port 8888 is added automatically, so the Jupyter Notebook server is reachable as soon as it starts.
Your virtual machine is now deploying, and Jupyter Notebook finishes installing shortly after the machine boots. Next, connect to your Jupyter Notebook server to open it in your browser.
Step 2: Connect to Your Jupyter Notebook Server
-
Wait for the server to start
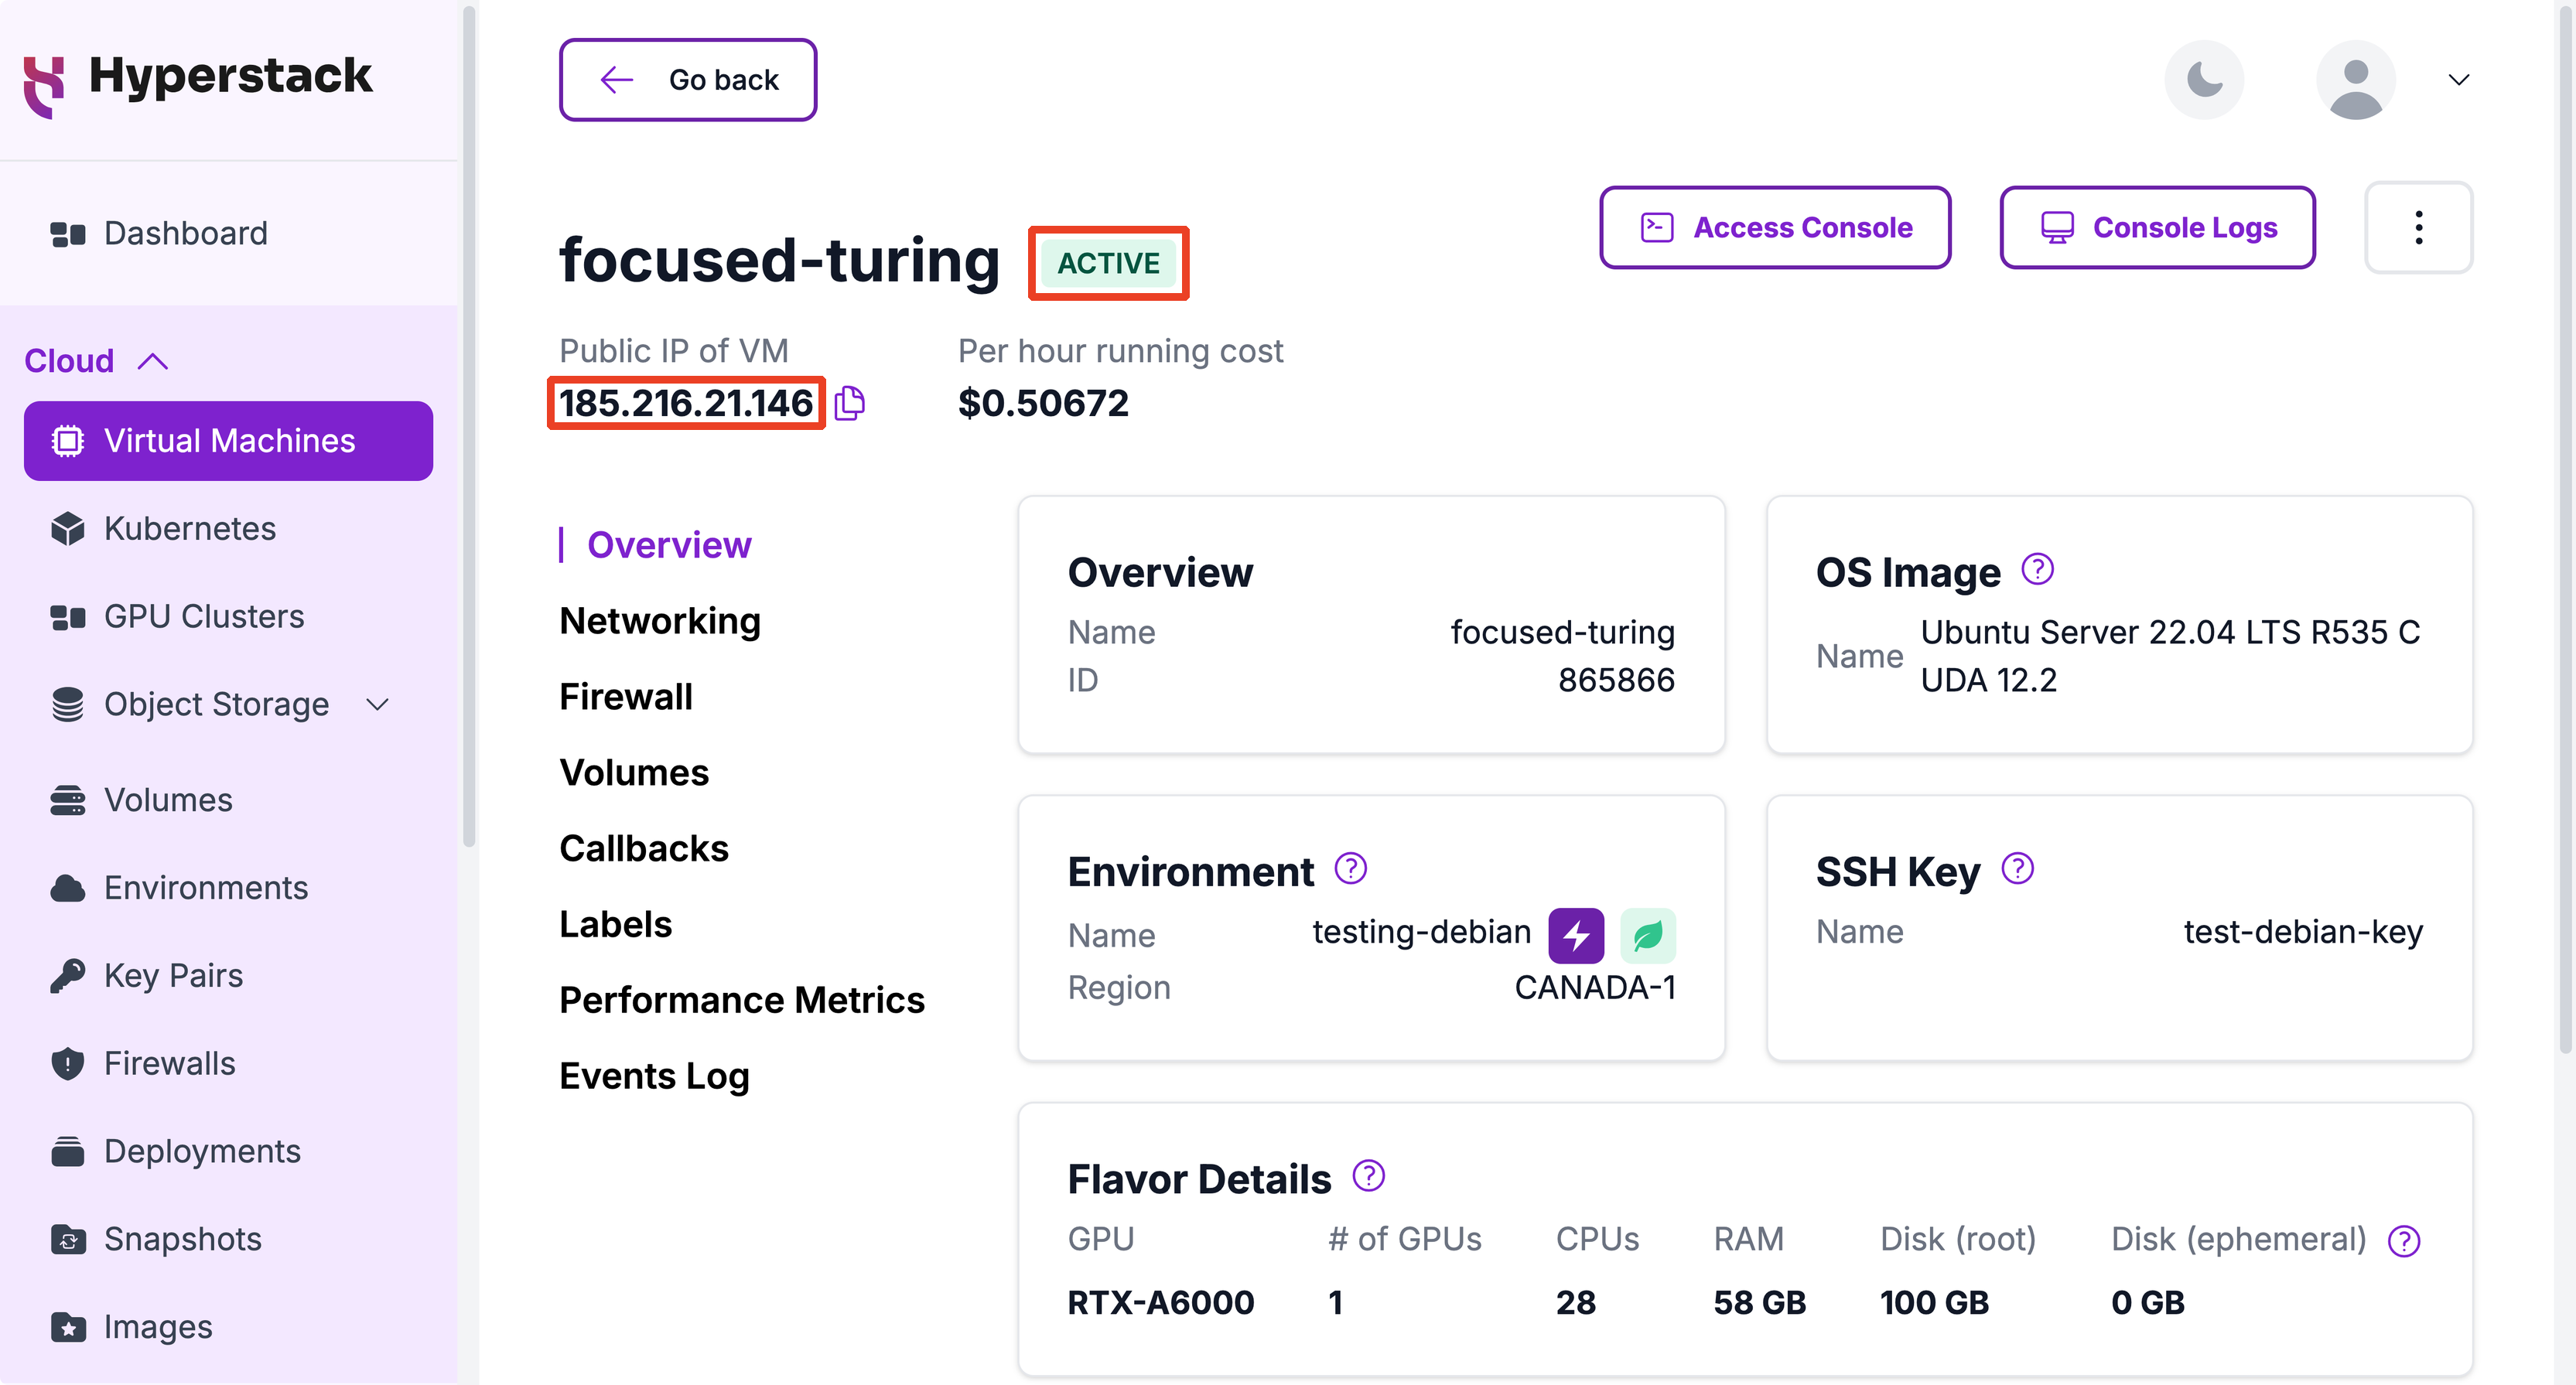
After the virtual machine reaches the ACTIVE state, the Jupyter Notebook server takes several additional minutes to install and start.
-
Open the Jupyter Notebook URL
In your browser, navigate to the following URL, replacing
[public-ip]with the public IP address shown on your virtual machine's details page:https://[public-ip]:8888The
https://prefix is required. The Jupyter Notebook server only accepts HTTPS connections. -
Bypass the browser security warning
The Jupyter Notebook server uses a self-signed TLS certificate, so your browser displays a security warning the first time you connect. Click Advanced, then choose to proceed to the site. Your connection is still encrypted; the warning appears only because the certificate is not issued by a public certificate authority.
-
Log in with your password
Enter the password you set in the Install Jupyter Notebook section during deployment, then click Log in.

You are now connected to the Jupyter Notebook server. With the GPU virtual machine running and Jupyter open in your browser, you are ready to write and run code. Next, run your first notebook to confirm that your notebook can access the GPU.
Step 3: Run Your First Notebook
-
Create a notebook
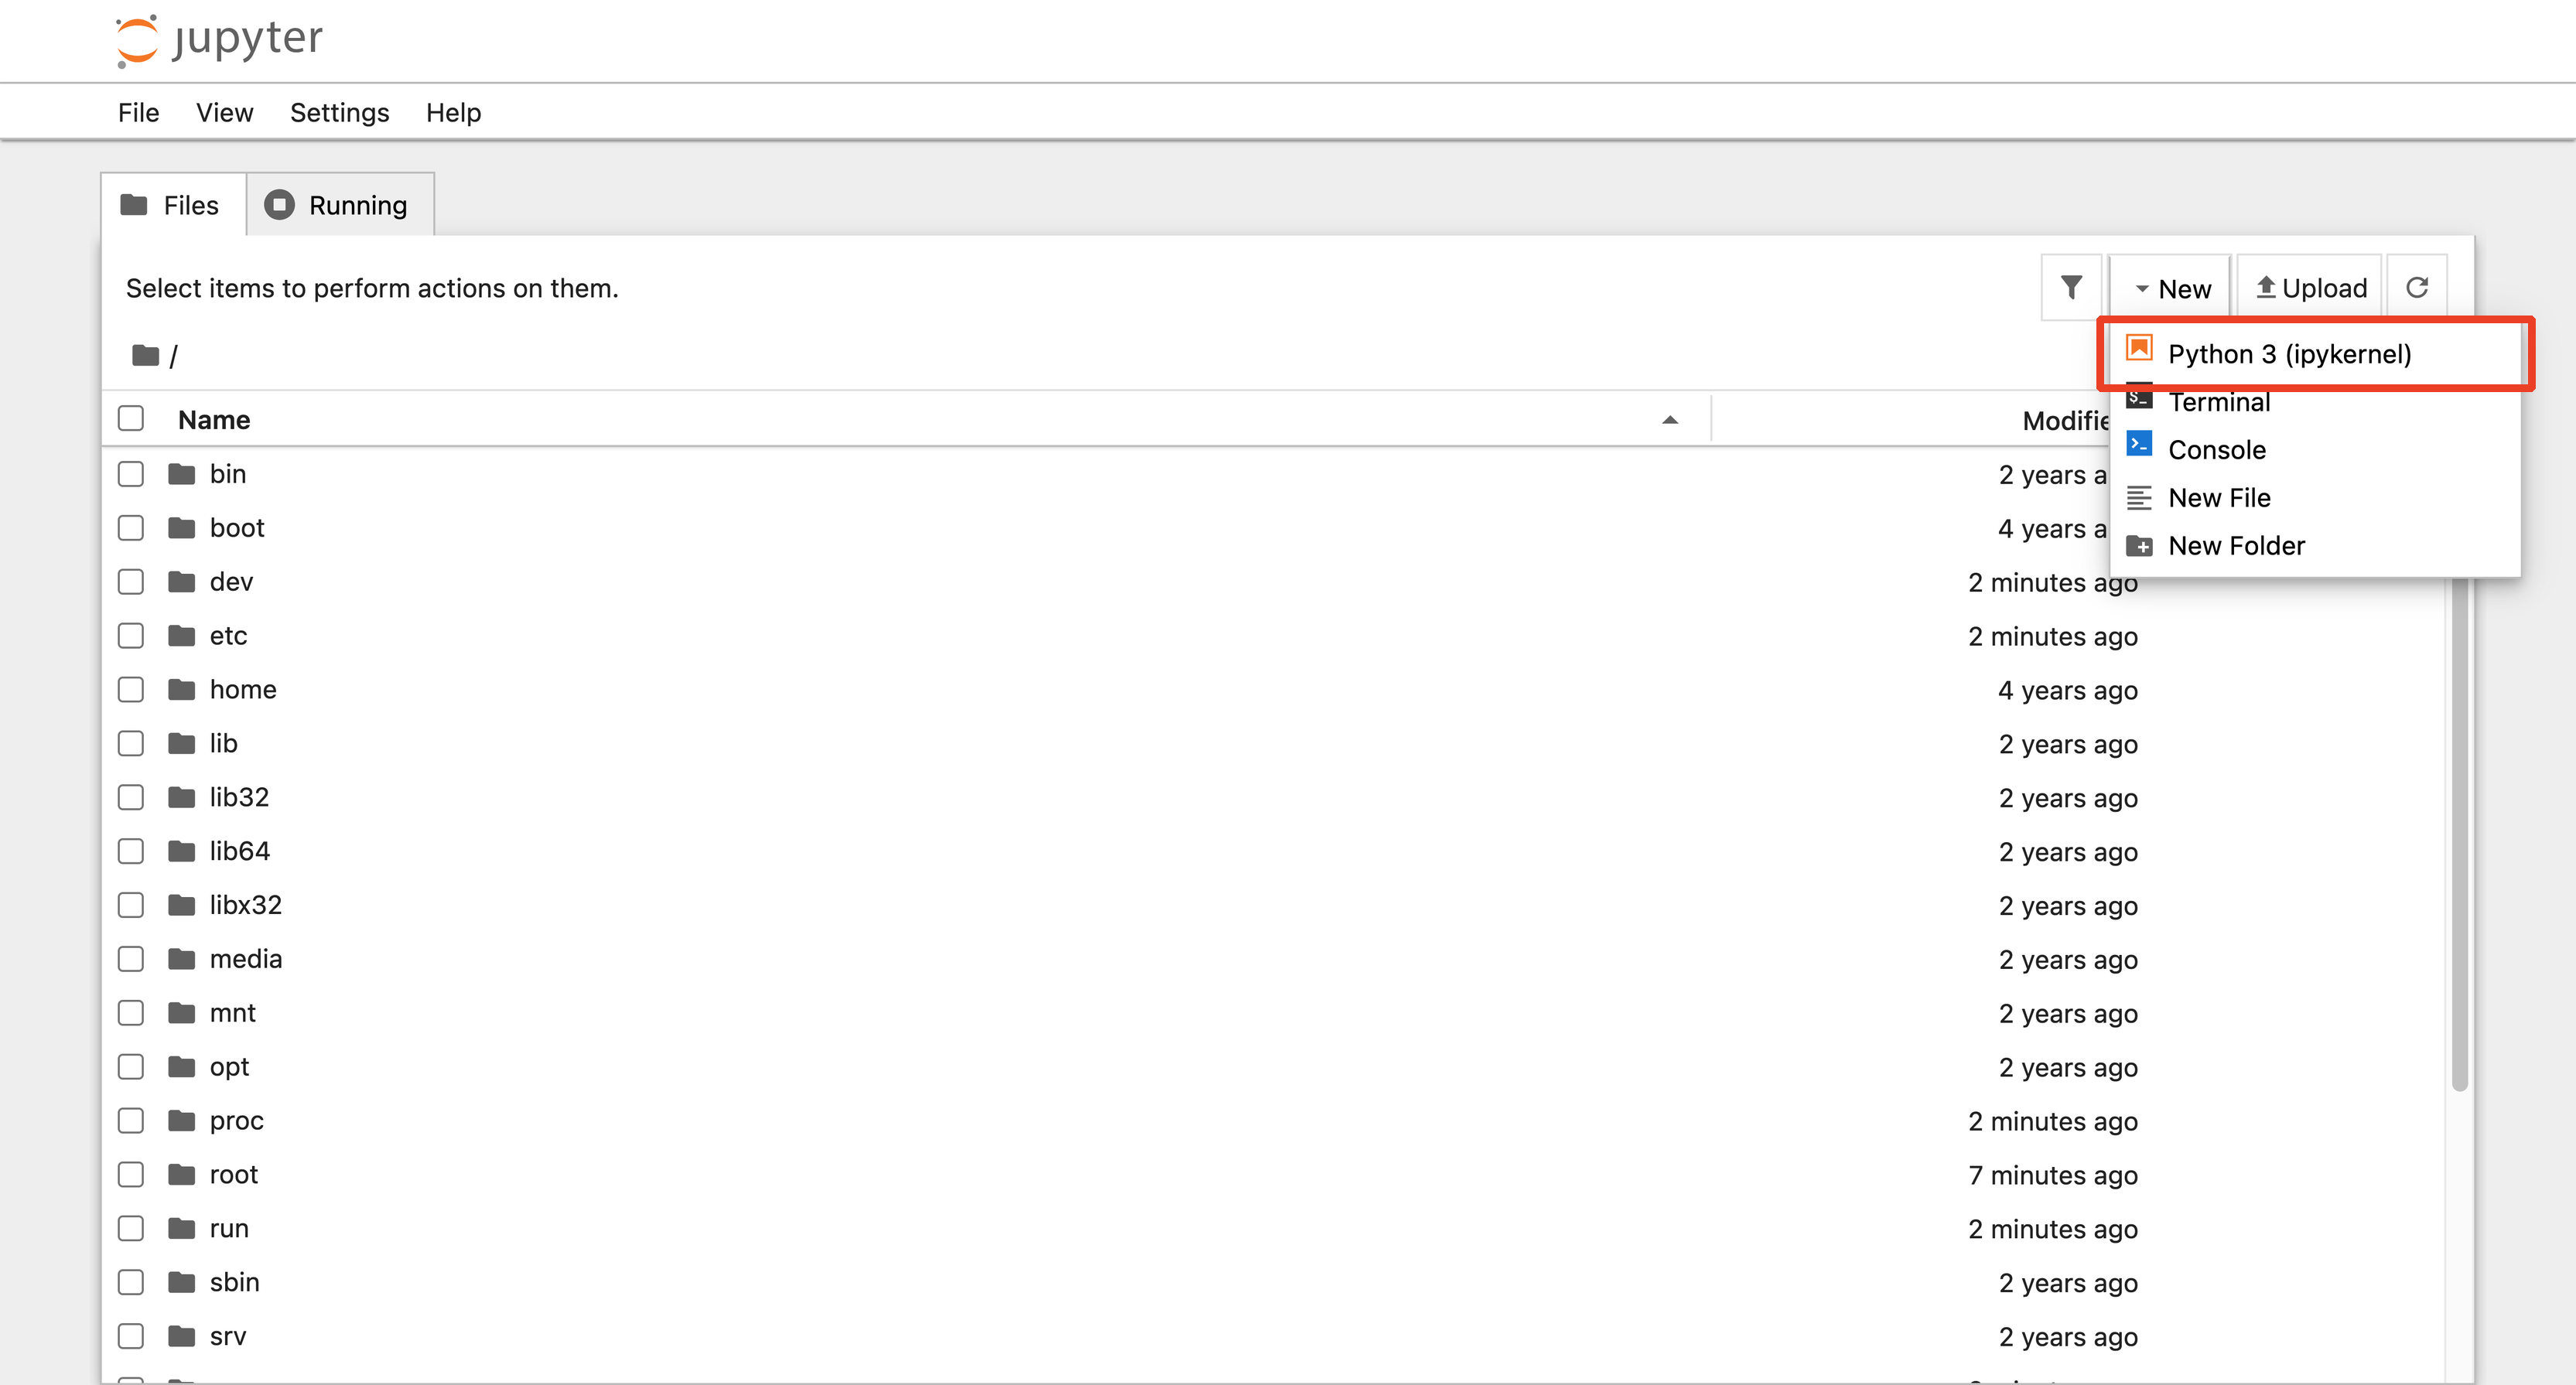
From the Jupyter home page, click New and select Python 3 (ipykernel). A new notebook opens in a separate browser tab.
-
Verify GPU access
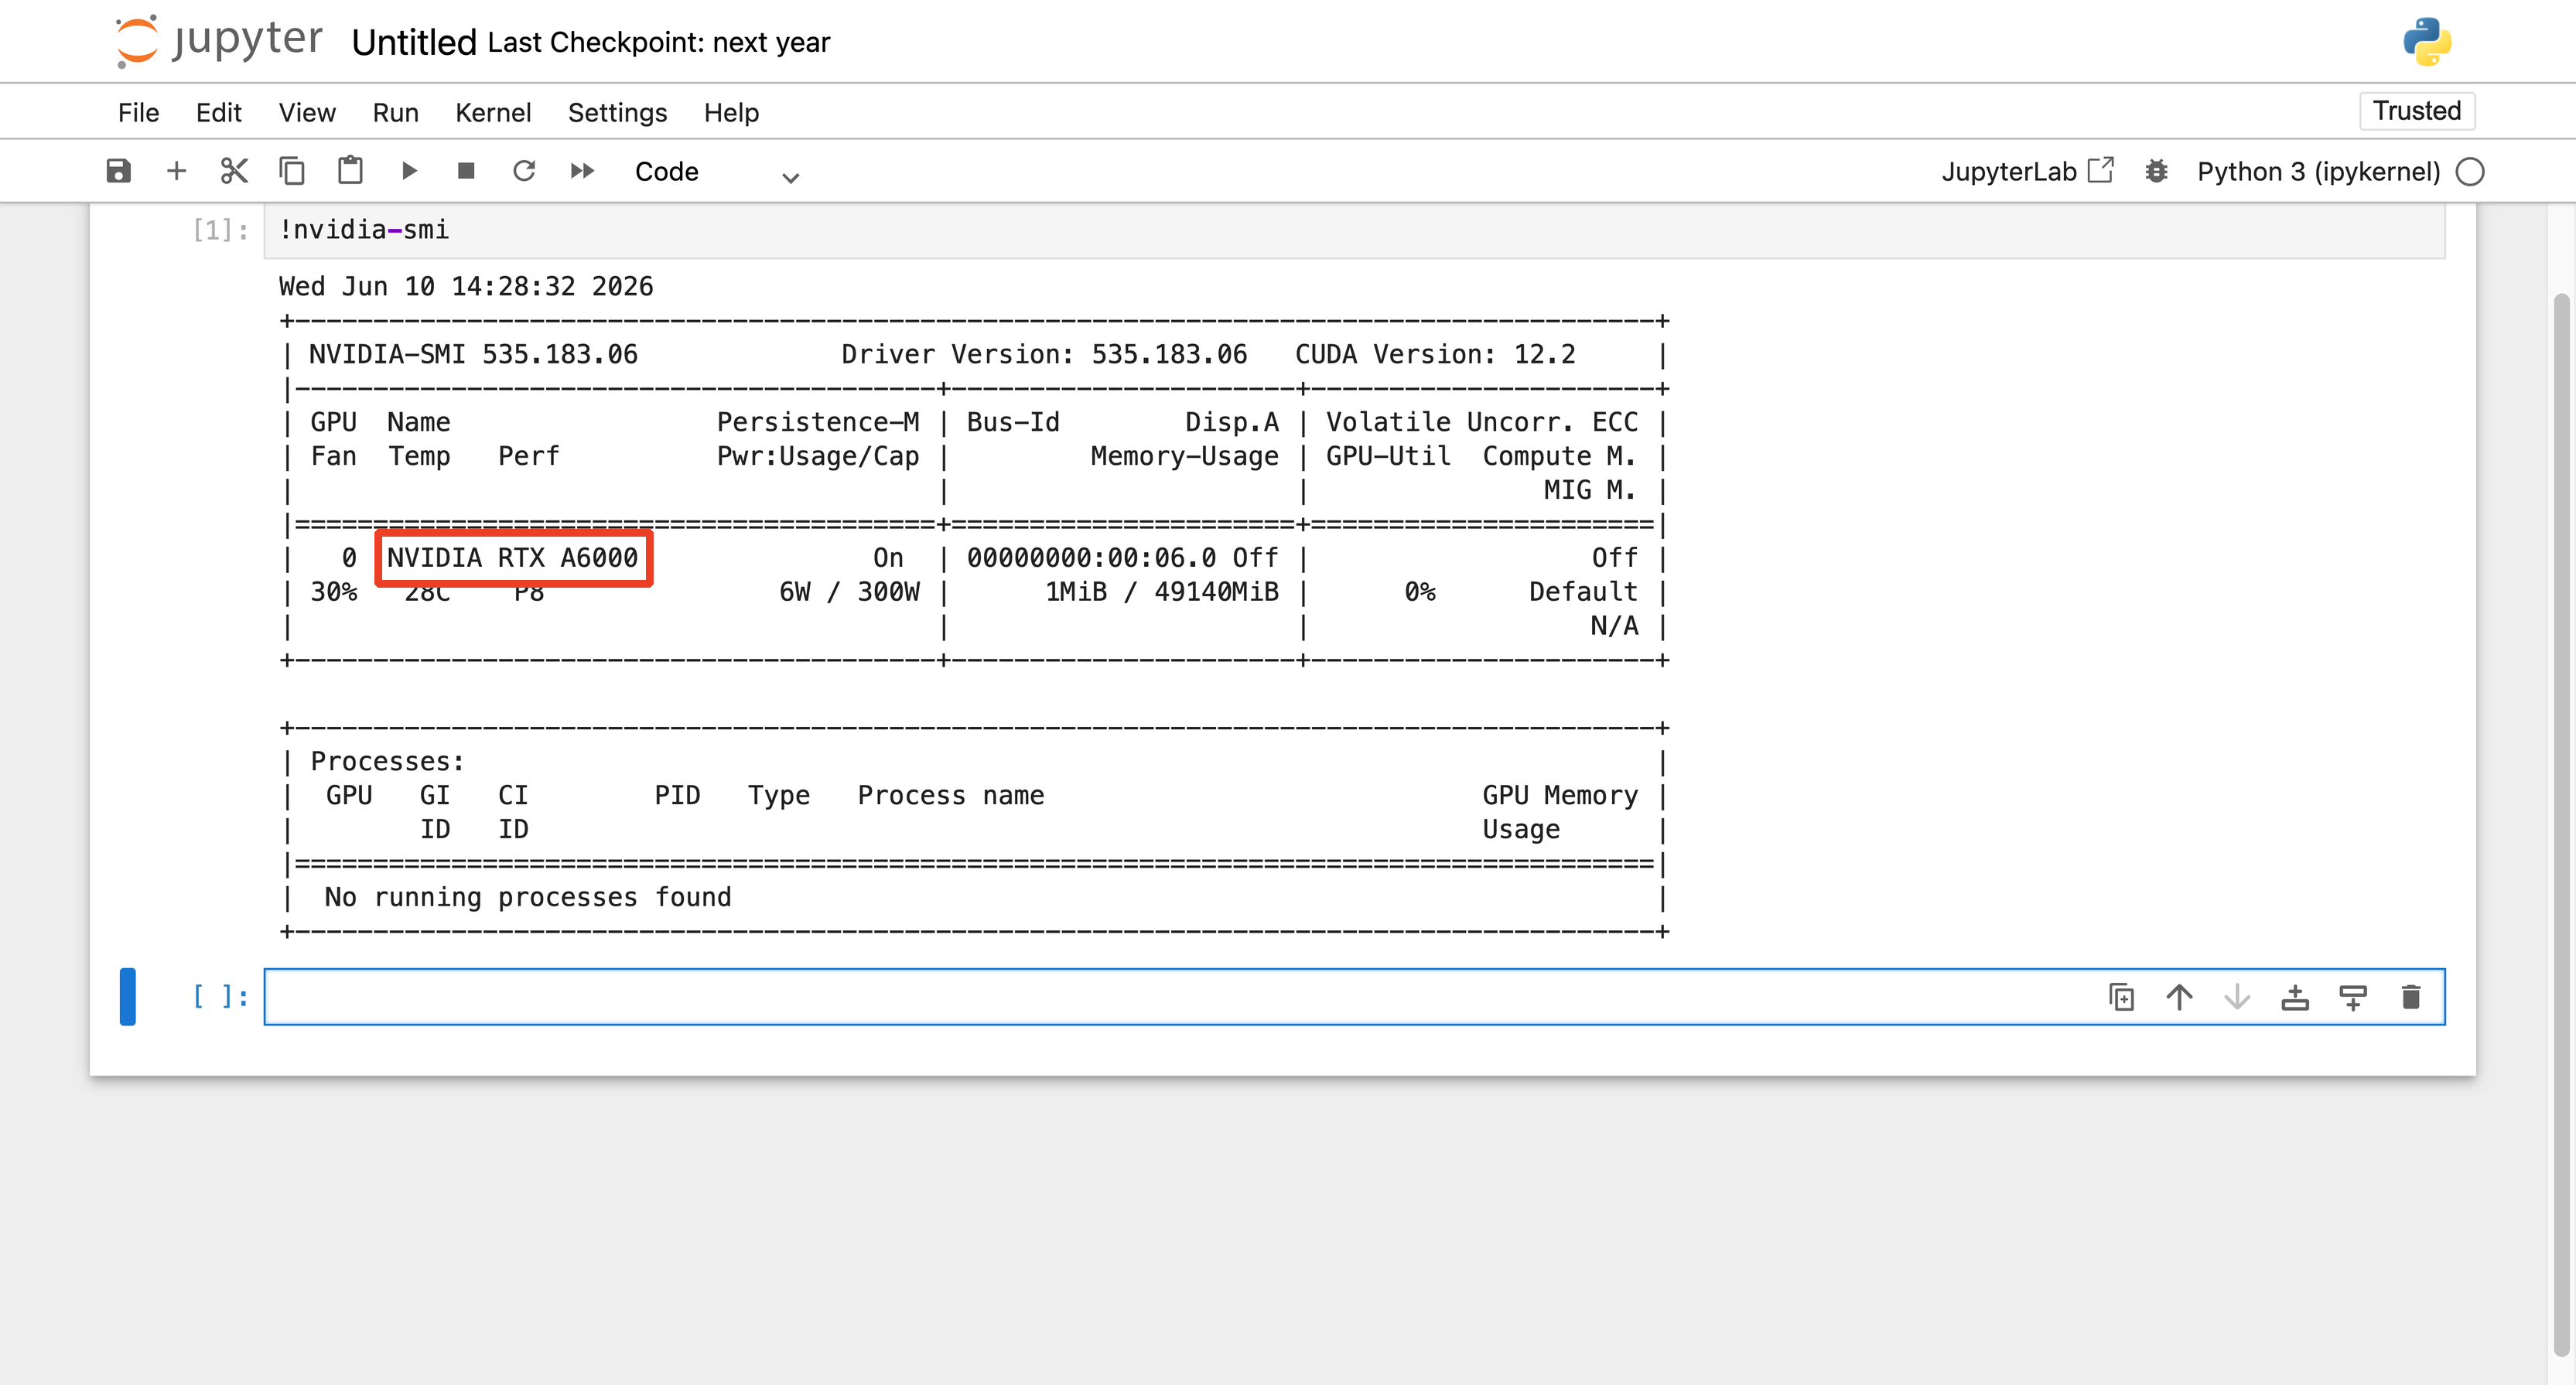
In the first cell, run the following command to confirm that your notebook can access the virtual machine's GPU:
python!nvidia-smiThe output lists the GPU model, driver version, and current utilization.
-
Start building
Your environment is ready. Install Python packages directly from a notebook cell using
!pip install, upload datasets and notebooks using the Upload button on the home page, and run GPU-accelerated code interactively.
Virtual machines bill for as long as they are running. When you're finished, hibernate to reduce charges or delete the VM if you no longer need it. See VM Status and State Management for lifecycle options.
Troubleshooting
Find solutions to common issues you might hit while following this tutorial. Select an issue to expand its solution:
The Jupyter Notebook URL does not load
- Confirm the virtual machine status is ACTIVE and that several minutes have passed since it became active. The Jupyter Notebook server installs and starts after the virtual machine boots.
- Confirm you are using
https://and port8888in the URL, with the virtual machine's public IP address. - Confirm a public IP address is attached to the virtual machine.
- On the virtual machine's Firewall tab, confirm the inbound rule for port 8888 is present with the SUCCESS status.
- Confirm the virtual machine was deployed from an image that includes the NVIDIA driver and CUDA. On plain OS images, the Jupyter Notebook server will not start. If you used a plain image, deploy a new virtual machine with an image such as Ubuntu Server 22.04 LTS R535 CUDA 12.2.
nvidia-smi fails with Failed to initialize NVML: Unknown Error
nvidia-smi fails with Failed to initialize NVML: Unknown ErrorIf a notebook cell running !nvidia-smi returns this error, the Jupyter environment started before the GPU was fully initialized. Reboot the virtual machine from its details page by clicking Hard Reboot, wait for it to return to the ACTIVE state, then reconnect to the Jupyter Notebook URL and run the command again.
Forgotten Jupyter password
The Jupyter Notebook password is set only during deployment and cannot be changed from the console. If you forget it, deploy a new virtual machine with a new password.
Notebooks and data stored only on the virtual machine are lost if you delete it. If you enabled SSH Access, you can still connect over SSH and copy your files off with scp before deleting the old virtual machine, even when you cannot log in to Jupyter.