FAQ
Frequently asked questions about Hyperstack.
SSH & Key Pairs
How do I enable SSH access to my virtual machine?
- Hyperstack
- API
To enable SSH access to your virtual machine in Hyperstack:
-
Within Hyperstack, navigate to the Virtual Machines page.
-
Click on the virtual machine for which you intend to enable SSH access.
-
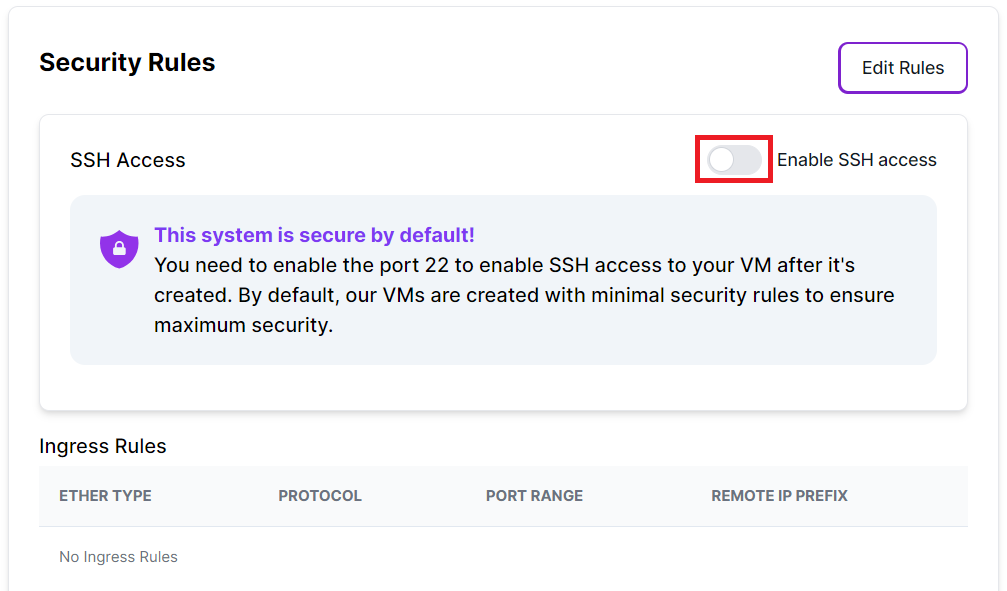
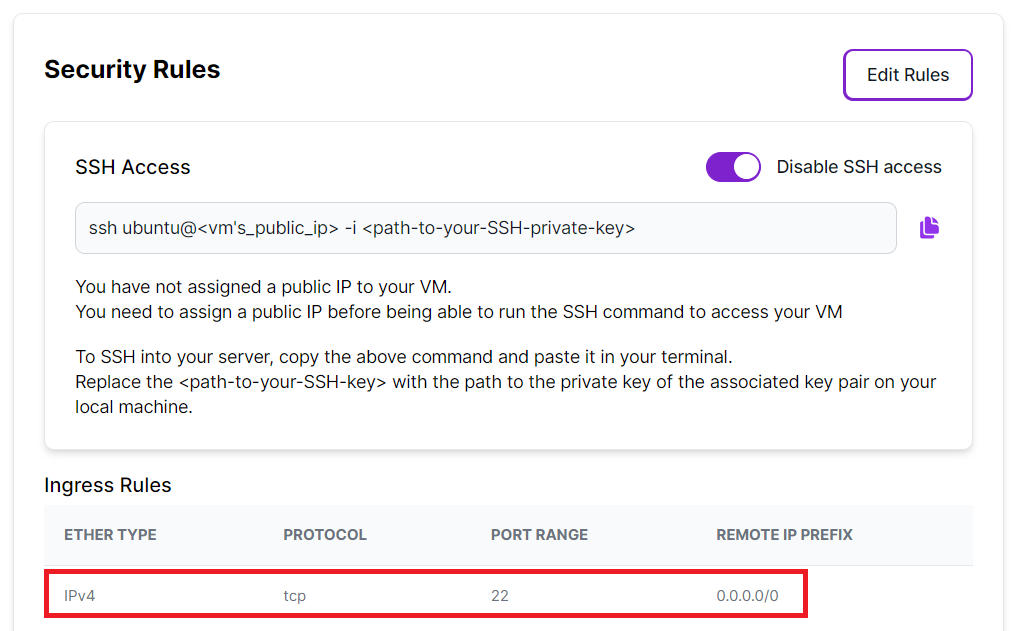
In the Firewall Rules section of the virtual machine, click the Enable SSH access button. This action will automatically generate a firewall rule allowing incoming traffic from any IP (0.0.0.0/0) on port 22 via the TCP protocol.
Incoming SSH traffic to this virtual machine will now be permitted.
Before
After
Send a POST request to /core/virtual-machines/{virtual-machine-id}/sg-rules endpoint replacing virtual-machine-id in the path with the ID of the virtual machine for which you want to enable SSH access, and complete the body of the request as specified below.
-
Include the integer ID of the virtual machine that this firewall rule is being attached to in the path of the request as follows:
/core/virtual-machines/{VM ID HERE}/sg-rules
-
Complete the request body with the following fields and values:
Field Name Field Input Description remote_ip_prefix0.0.0.0/0Allows traffic from any source IP address. directioningressDesignates that the firewall rule is for incoming traffic. ethertypeIPv4Indicates the use of Internet Protocol version 4. protocoltcpSpecifies the use of Transmission Control Protocol. port_range_min22Specifies the minimum port value for SSH. port_range_max22Specifies the maximum port value for SSH.
curl -X POST https://infrahub-api.nexgencloud.com/core/virtual-machines/{virtual-machine-id}/sg-rules \
  -H "accept: application/json" \
  -H "api_key: YOUR API KEY" \
  -d '{
        "remote_ip_prefix": "0.0.0.0/0",
        "direction": "ingress",
        "ethertype": "IPv4",
        "protocol": "tcp",
        "port_range_min": 22,
        "port_range_max": 22
    }'
To authenticate Infrahub API requests, add an authorization header to your API request that contains an API Key as follows:
-H "api_key: YOUR API KEY"
I'm trying to SSH into my virtual machine but I don't know which username to use.
Each virtual machine has a default username set by its operating system image. Use that username in your SSH command, not your Hyperstack account name.
| Operating system | SSH username |
|---|---|
| Ubuntu | ubuntu |
| AlmaLinux | almalinux |
| Debian | debian |
Connect with the following command, replacing the username with the one for your image:
ssh -i [path_to_ssh_key] [os_username]@[vm_ip_address]
[path_to_ssh_key]is the path to the private key you created for the virtual machine.[os_username]is the username from the table above.[vm_ip_address]is the address shown under the PUBLIC IP column on the My Virtual Machines page.
After you set a root password during an SSH session, you can also log in as root through the VNC console. See Connecting to an Ubuntu VM.
References:
If I create an SSH key in each environment, are the private keys the same? Why isn't my existing key available for a new VM?
Each SSH key pair is created within a single environment. A key pair you generate in one environment is a separate key pair with its own private key, so generating a key in each environment gives you a different private key in each one.
To use one private key everywhere, generate the key once, then import its existing public key into each environment you need it in.
-
If you generated the key with
ssh-keygen, your public key is the.pubfile saved alongside the private key. -
If you generated the key in the Hyperstack console, only the private key was downloaded. Run the following command to print the public key:
terminalssh-keygen -y -f [path_to_ssh_key]
- Hyperstack
- API
Repeat these steps for each environment:
-
Navigate to the Key Pairs page and click Create a new Key Pair.
-
In the popup, select the target environment, enter a name for the key, and paste your existing public key into the Public Key field.
-
Click Create Key Pair.
Send a POST request to /core/keypairs once per environment, setting environment_name to the target environment and public_key to your public key.
curl -X POST "https://infrahub-api.nexgencloud.com/v1/core/keypairs" \
  -H "api_key: YOUR API KEY" \
  -H "Content-Type: application/json" \
  -d '{
    "name": "example-key-name",
    "environment_name": "example-environment-name",
    "public_key": "ssh-ed25519 AAAA... [email protected]"
  }'
References:
Can I provision my VM to use a password instead of an SSH key?
To access your VM, use the SSH key that was associated with your VM during the deployment process, or configure your VM during deployment to allow password-based authentication. Please note that accessing your VM via SSH is more secure than using a password-only connection.
- Bash
- YAML
To enable password-based login for your VM, set a user password during provisioning using the following Bash script:
echo "root:Your-Super-Secure-Password" | chpasswd
echo "ubuntu:Another-Super-Secure-Password" | chpasswd
sed -i -E 's/^#?(PermitRootLogin\s+).*/\1yes/' /etc/ssh/sshd_config
sed -i -E 's/^#?(PasswordAuthentication\s+).*/\1yes/' /etc/ssh/sshd_config
systemctl restart sshd
To enable password-based logins to your VM, you must set a password for your user. During the provisioning process, use the following Cloud-Init script to enable password authentication and set user passwords:
#cloud-config
ssh_pwauth: True
chpasswd:
  expire: false
  users:
    - { name: root, password: Your-Super-Secure-Password, type: text }
    - { name: ubuntu, password: Another-Super-Secure-Password, type: text }
runcmd:
  - sed -i -E 's/^#?(PermitRootLogin\s+).*/\1yes/' /etc/ssh/sshd_config
  - systemctl restart sshd
References:
Connecting via SSH returns Permission denied (publickey).
Permission denied (publickey).This means the server rejected your key before the connection completed. Confirm each of the following, all of which are required for key-based SSH access:
-
Use the username for your OS image. The username must match the operating system on the virtual machine:
ubuntufor Ubuntu,almalinuxfor AlmaLinux,debianfor Debian. Connecting as the wrong user is rejected. -
Use the private key that matches the imported public key. SSH authenticates with the private key on your machine against the public key stored in Hyperstack. Point
-iat the private key whose public key was added to the virtual machine:terminalConnect with an explicit key and usernamessh -i [path_to_ssh_key] [os_username]@[vm_ip_address] -
Restrict the private key file's permissions. If SSH prints
WARNING: UNPROTECTED PRIVATE KEY FILE!, the key file is readable by others and SSH refuses to use it.On Linux and macOS:
terminalchmod 600 [path_to_ssh_key]On Windows (PowerShell):
powershellicacls [path_to_ssh_key] /inheritance:r /grant:r "${env:USERNAME}:R" -
Confirm the key exists in the VM's environment. A key pair belongs to the environment it was created in, and the virtual machine must use a key pair from its own environment. To reuse a key, import its public key into that environment.
If the connection is refused before authentication, the cause is reachability rather than the key. See Connection refused or VM not reachable.
References:
Attempting to connect via SSH leads to Offending key for x.x.x.x in ~/.ssh/known_hosts:XXXX. Host key verification failed.
Offending key for x.x.x.x in ~/.ssh/known_hosts:XXXX. Host key verification failed.If you have just created a new Virtual Machine and assigned a public IP address, you may encounter this error. This is because this IP address was previously used by another Virtual Machine, and the SSH fingerprint from the previous Virtual Machine is still stored in your ~/.ssh/known_hosts file. To resolve this issue, simply remove the offending line from your ~/.ssh/known_hosts file.
If you've connected to this VM before, do not ignore this message. It may indicate a potential security issue. The server identity for this IP address has changed and does not match the one stored on your system. Proceed carefully and verify the server's identity.
If you are unsure, please contact support at [email protected].
You can clear this error by running the following command:
ssh-keygen -R [public_ip_address]
Make sure to replace [public_ip_address] with the public IP address of your Virtual Machine.
Attempting to connect with an SSH key is leading to too many authentication failures.
too many authentication failures.This occurs for one of two reasons:
- You have not configured your SSH client with a valid authentication method.
- Your SSH client is configured with multiple authentication methods, and it tries too many that fail before it reaches the one that succeeds.
To debug this issue, consider the following steps:
- Utilize the
-Gflag, such asssh -G -i .ssh/id_rsa ubuntu@<public-ip>. This command prints the client's configuration. Verify that the configuration appears correct, particularly checking theuser,hostname, andidentityfilefields. (Note:identityfileis another term for private key.) - Enable debug output in your SSH client:
ssh -vvv -i .ssh/id_rsa ubuntu@<public-ip>. Eachvin-vvvincreases the level of debug verbosity. With this output, you can pinpoint where the authentication handshake fails.
If you observe that your SSH client is attempting too many incorrect keys instead of your preferred ones, you can force it to stop using the other keys by employing the IdentitiesOnly configuration option. This can be enabled in two ways:
- If you use a
.ssh/configfile, add a line to your virtual machine's configuration statingIdentitiesOnly yes. - If you prefer not to modify your
.ssh/config, add it to your command line:ssh -i .ssh/id_rsa -o IdentitiesOnly=yes ubuntu@<public-ip>
References:
VM Connectivity
I am new to Hyperstack. How do I deploy and connect to my first VM?
The Getting Started guide walks you through deploying your first GPU VM and connecting to it over SSH. It covers choosing a flavor, creating an environment and SSH key, enabling SSH access, assigning a public IP, and the per-OS connection commands.
References:
My virtual machine shows a "no bootable disk" error.
This error means the VM cannot find an operating system to boot from. Two common causes:
- No OS on the volume: The bootable volume used to deploy the VM was created without an OS image selected. Verify the volume has an image installed before deploying.
- Volumes not available in the region: Some regions have volume functionality disabled. See Region Features to check whether volumes are supported in your region.
If you intended to deploy from a standard OS image rather than a bootable volume, create a new VM and select an image directly from the Operating System Image field.
References:
My virtual machine is not reachable, or SSH returns Connection refused.
Connection refused.A refused or timed-out connection means traffic is not reaching the SSH service, which is separate from key authentication. Check the following in order:
-
Confirm the VM has finished booting. On the My Virtual Machines page, the virtual machine must show
ACTIVE. Services can take some time to initialize after deployment, so if you see a connection error, retry after a few minutes. -
Confirm a public IP is assigned. SSH requires a public IP address. If no address is listed under Public IP, navigate to the Networking tab on the VM's details page and toggle Public IP Attached to assign one.
-
Confirm port 22 is open. Click the Firewall tab, then click Enable SSH access. This adds a firewall rule allowing incoming traffic on port 22 from any IP (0.0.0.0/0).
-
Test the port. Check whether port 22 is reachable:
terminalTest port 22telnet [vm_public_ip_address] 22A
Connection refusedresponse means the port is closed, so recheck the firewall rule above. A successful connection confirms the port is open and you can connect via SSH.
References:
My virtual machine is ACTIVE but not reachable.
ACTIVE but not reachable.If a virtual machine displays the ACTIVE status but is still unreachable, it may still be booting. VMs with large, high-performance flavors such as 8xH100 can take additional time to initialize after reaching ACTIVE. Check the VM console to verify the boot status.
To troubleshoot SSH connection issues, see Secure Shell (SSH) Access.
References:
How do I access my virtual machine from my local Ubuntu after adding an SSH key pair?
To gain access to your virtual machine via Secure Shell (SSH), follow the procedures found here.
References:
If I don't enable the public IP address, how can I access my virtual machine?
Without a public IP, your VM has no internet-reachable address, so you cannot SSH to it directly from your local machine. You can still reach it in one of the following ways:
- VNC console: Open the VM's VNC console from the Hyperstack dashboard to access the VM in your browser without a public IP. Because Hyperstack Linux images use SSH key authentication and have no default password, follow the recovery steps in I don't have access to the SSH key associated with my virtual machine to log in.
- Bastion (jump) host: For a VM that intentionally has no public IP, route access through a separate bastion VM that does have a public IP and is permitted to reach the private VM by its private IP. SSH into the bastion, then connect onward to the private VM. See Bastion Servers for the topology and the firewall rules it requires.
- Assign a public IP later: If you decide you need direct external SSH, you can attach a public IP to an existing VM at any time. See Assign a Public IP Address to a VM.
References:
I don't have access to the SSH key associated with my virtual machine. How can I login without it?
The following instructions guide you through accessing your virtual machines without the need for an SSH key, utilizing the VNC console recovery mode. Note that these procedures are designed for Ubuntu 22 instances; details may differ for other operating systems.
-
In Hyperstack, go to the "Virtual Machines" tab and click on the virtual machines "NAME" you want to access, to view its details.
-
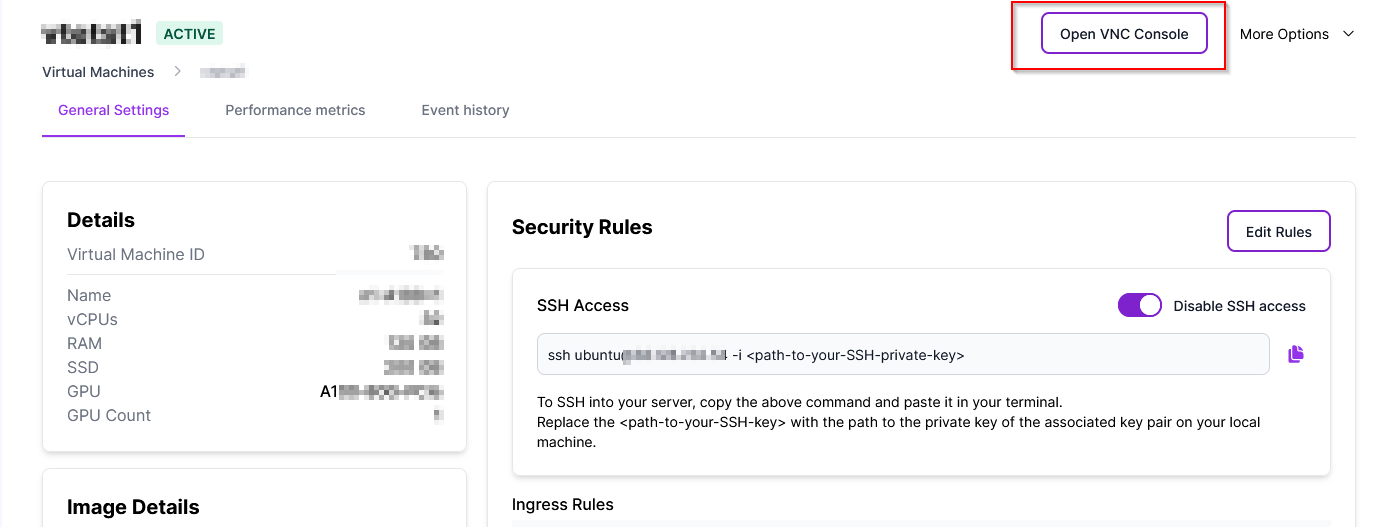
Within the VM's details, click "Open VNC Console".
-
To access the grub menu, click the "
Send CtrlAltDel" command (found at the top right of the console), and then click on the black console window while holding the "Shift" key.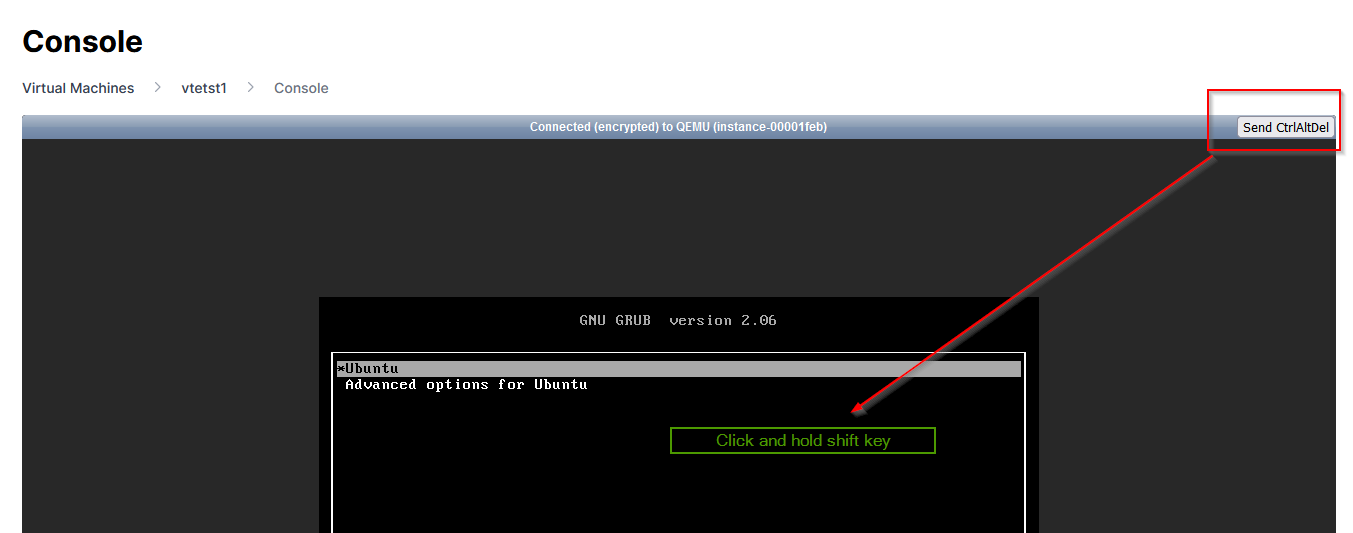
-
Select "
Advanced options" > "Recovery mode" from the grub menu.
-
Use arrow keys to navigate to the menu option labeled "
root", and press "Enter" (it may appear distorted due to console messages, this is expected).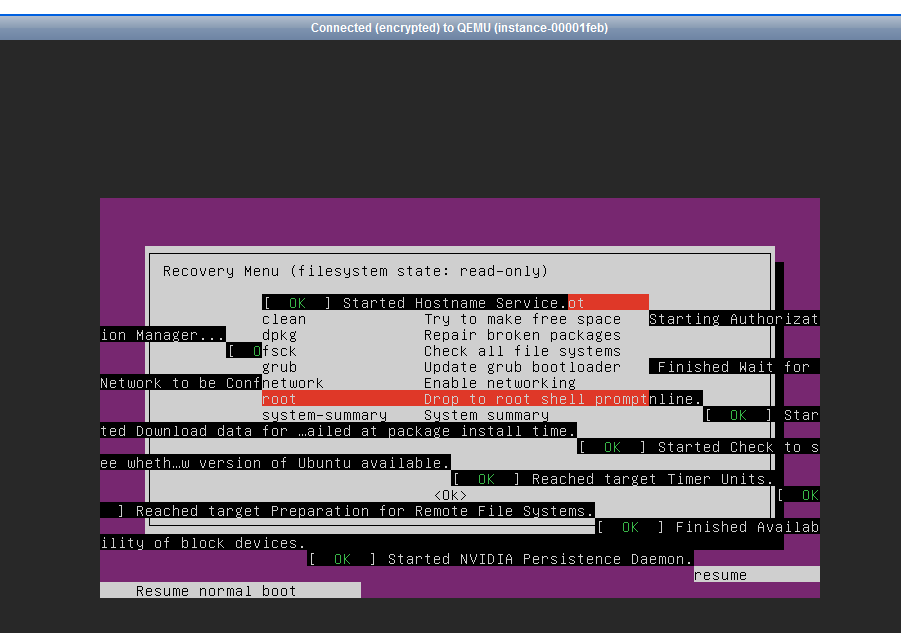
-
Root access to the system will be granted, allowing you to carry out administrative tasks.
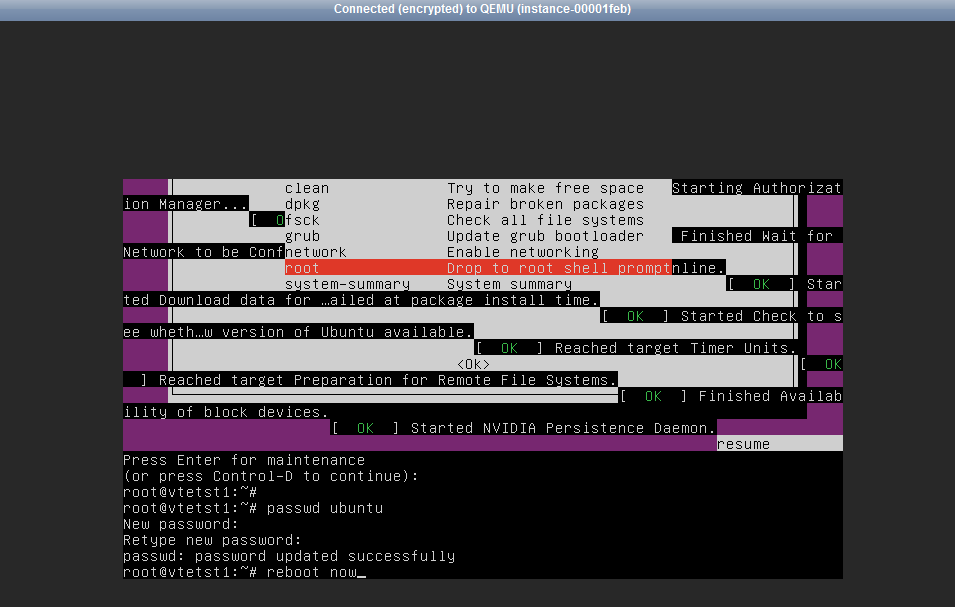
How to reset your Ubuntu password:
a. Send the "passwd" command.
b. Enter your new password twice. -
Execute the "
reboot now" command to restart the virtual machine, and the system changes will take effect.
Now, with root privileges, you can access and manage your virtual machine without needing your SSH key.
Billing & VM States
Which virtual machine states incur billing costs?
We bill only for VMs in the ACTIVE and SHUTOFF states. For HIBERNATED VMs, charges apply only to the storage and any public IP address that you choose to retain during hibernation. By default, public IPs are released and do not incur charges. Learn more about public IP behavior during hibernation. Transitional states like HIBERNATING or RESTORING do not incur charges. Additionally, the ERROR state resulting from failed VM operations is also charge-free.
VM States and Billing Status
The table below describes the billing costs of virtual machine states.
| Power State | Description | Billing |
|---|---|---|
ACTIVE | The VM is running, and all resources are allocated. This is the standard working state. | Billed |
SHUTOFF | When a VM is stopped, it transitions to a SHUTOFF state, where billing continues for all resources, as they remain reserved exclusively for that VM. To prevent ongoing billing costs, ensure the virtual machine is either HIBERNATED or DELETED. | Billed |
HIBERNATED | When a VM is HIBERNATED, its configuration and root disk data are preserved, and all hardware resources associated with the VM’s flavor are deallocated. Billing continues for the root disk data saved to persistent storage, as well as for the public IP address if you choose to retain it during hibernation; see Default Behavior for Public IPs for details. | Partially Billed |
DELETED | The VM is permanently removed, and all resources are de-allocated. |
User-initiated states
The table below outlines the user-initiated transitional states of virtual machines. It's important to note that none of these transitional states result in charges. Additionally, the ERROR state, which occurs due to failed operations on the VM, incurs no charges.
| Power state | Description | Billing |
|---|---|---|
HIBERNATING | The VM is transitioning into a HIBERNATED state. | Not Billed |
RESTORING | The VM operating system and software are restarting from HIBERNATION and returning to an ACTIVE state. | Not Billed |
STARTING | The request to start the VM has been accepted. | Not Billed |
STOPPING | The VM is being stopped. This is the transition state between ACTIVE and SHUTOFF. | Not Billed |
REBOOTING | The VM is being restarted, simulating the process of unplugging and rebooting a physical machine. | Not Billed |
CREATING | The request to create the VM has been accepted. | Not Billed |
BUILD | The VM is being built with the specified configuration. | Not Billed |
DELETING | The VM is being deleted. | Not Billed |
ERROR | The VM is stuck in an error state. The last operation on the virtual machine was unsuccessful. | Not Billed |
References:
How do I check the billing status of my virtual machines?
You can easily check the status of your virtual machines by navigating to the Virtual Machines page in Hyperstack. This user-friendly interface offers a convenient way to view the running states of your virtual machines, as shown in the example below.
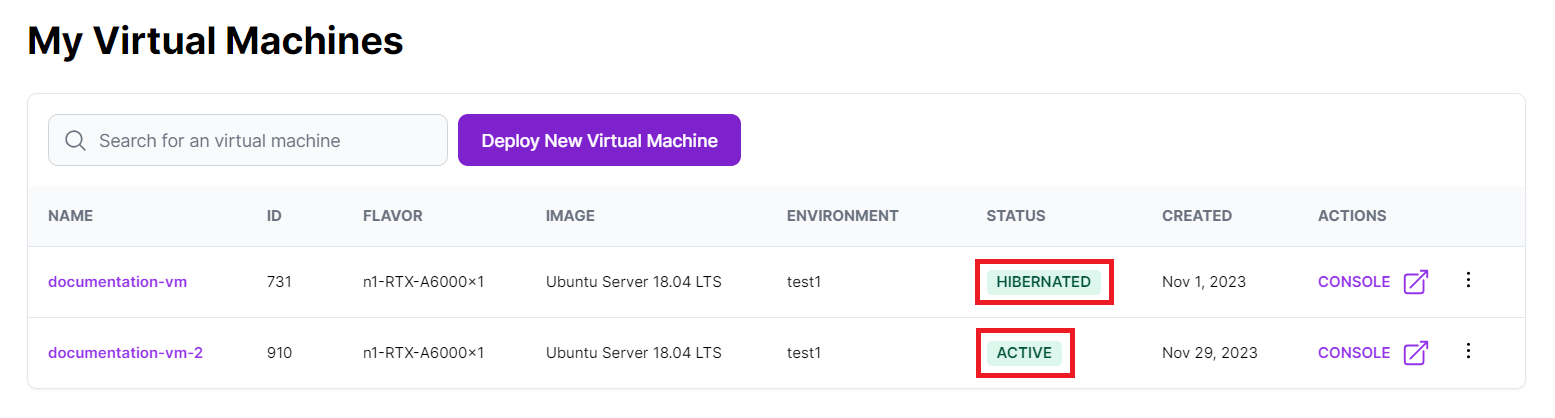
The status of your virtual machines can also be accessed through the List virtual machines Infrahub API endpoint by making a GET request to /core/virtual-machines. This API call provides detailed information about the running states of your virtual machines as, illustrated below.
curl -X GET "https://infrahub-api.nexgencloud.com/v1/core/virtual-machines" \
  -H "accept: application/json"\
  -H "api_key: YOUR API KEY"
{
    "status": true,
    "message": "Getting VMs successful",
    "instances": [
        {
            "id": 731,
            "name": "documentation-vm",
            "status": "HIBERNATED",
        },
        ...
    ]
}
The status field indicates the current running state of the virtual machine. In this example, the status is HIBERNATED, signifying that the virtual machine's state is saved, and all resources, except for storage and any explicitly retained public IP address, are de-allocated. Billing continues only for the attached storage and retained public IP address during the hibernation period.
References:
What is the difference between the virtual machine states SHUTOFF and HIBERNATED?
SHUTOFF and HIBERNATED?When a virtual machine is in the SHUTOFF state, billing continues because its allocated resources are still reserved for your use. This includes CPUs, RAM, GPUs, and local storage.
When a virtual machine is in the HIBERNATED state, the current state of the VM is saved to persistent storage, and its hardware resources (CPU, GPU, RAM, and ephemeral storage) are deallocated. As a result, you are not billed for these deallocated resources. However, billing does continue for the saved root disk data and any retained resources, such as volumes or public IP addresses that were explicitly configured to remain attached during hibernation.
By default, a VM's public IP is released during hibernation and reassigned on restoration. If you choose to retain the public IP, it remains attached and incurs standard hourly charges. Learn more about public IP behavior during hibernation.
When you restore your VM, it resumes with the same configuration, but if the public IP was not retained, a new public IP is assigned.
No charges apply during transitional states like HIBERNATING or RESTORING, and you are not billed for VMs in the ERROR state caused by failed operations.
Click here for instructions on how to change the state of your virtual machines.
In Hyperstack, you can change the state of your virtual machines using these steps:
-
Go to the details page of the VM you want to modify as illustrated below, and hover your cursor over the "More Options V" dropdown in the top right corner of the window to see the VM state-changing actions available for execution on the virtual machine.
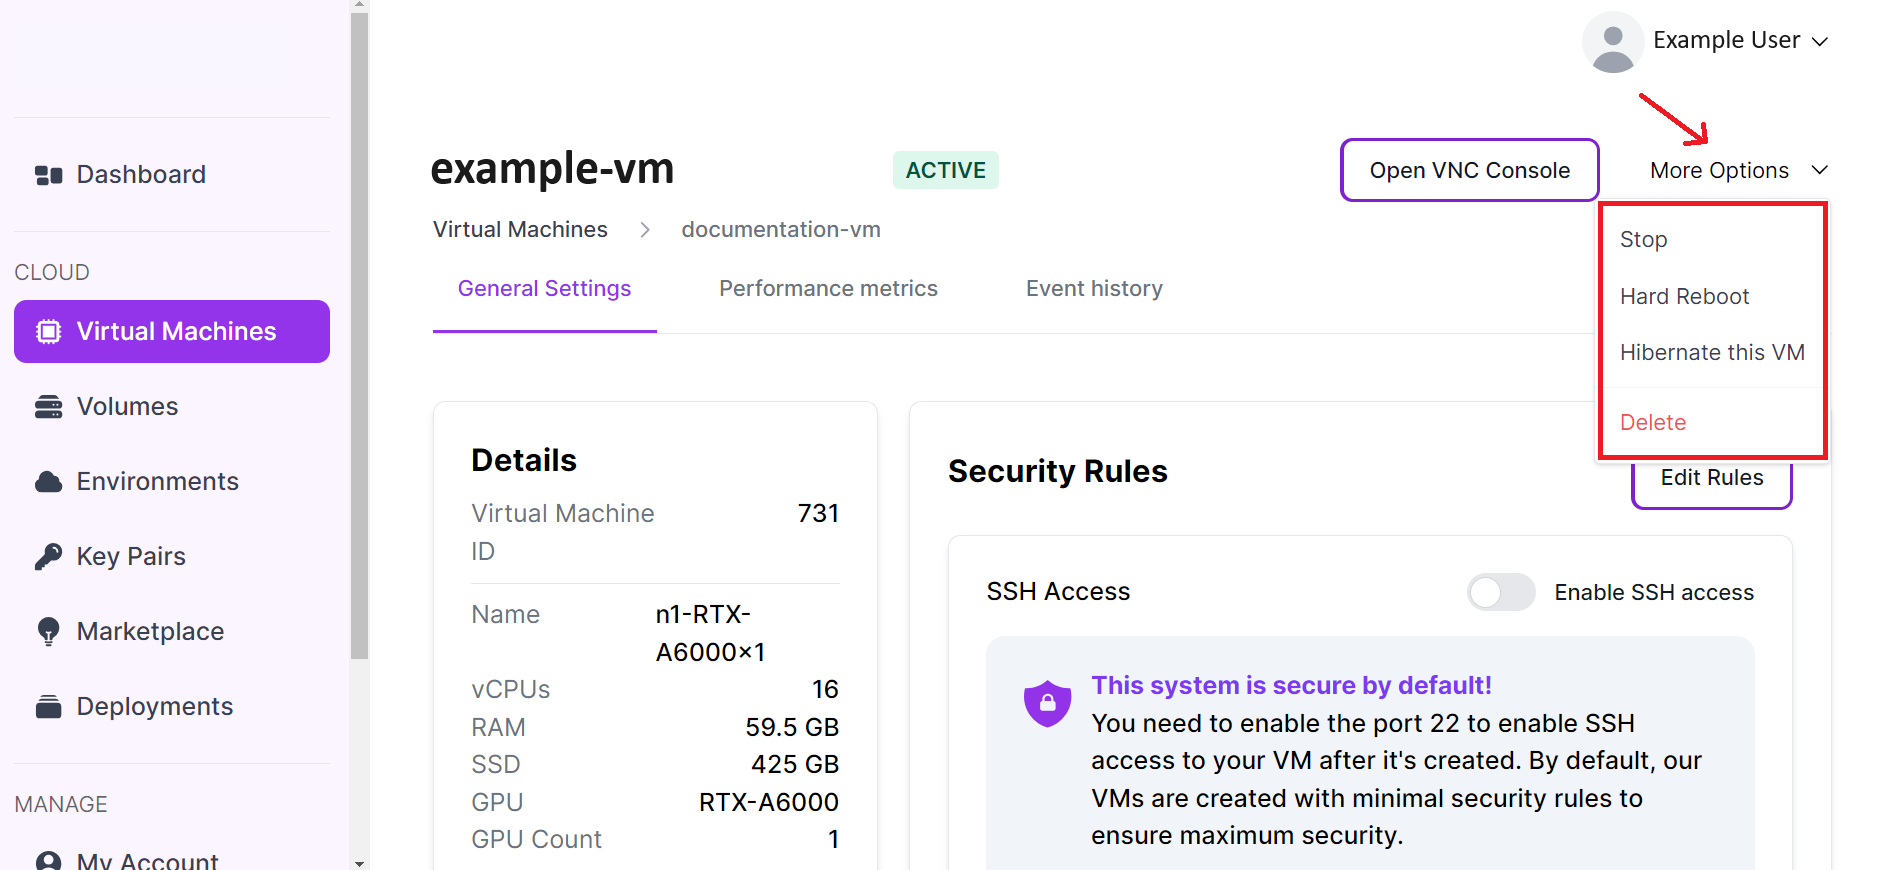
-
Select the VM state-changing action based on your needs.
- Stop - Transitions your virtual machine into a
SHUTOFFstate. - Hard Reboot - Restarts the virtual machine's operating system and all its running programs.
- Hibernate this VM - Transitions your virtual machine into a
HIBERNATEDstate. - Delete - Permanently deletes a virtual machine.
The transition of your virtual machine to the new state might take some time.
Changing VM state using the Infrahub API:
The Infrahub API can be used to HIBERNATE or DELETE your virtual machine, refer to the instructions available here.
To avoid data loss, before modifying your virtual machines (hibernate, resize, or delete), back up the data from the temporary storage of the current session, known as the ephemeral disk, to one or more Shared Storage Volumes (SSVs). See the instructions below:
How to save your workload data to an SSV
VM data can be stored by utilizing Shared Storage volumes (SSVs).
-
Create a volume either through Hyperstack, or by using the Infrahub API's "Create volume" endpoint.
-
Attach and mount the volume to your virtual machine, achieved either through Hyperstack or by using the "Attach volumes to virtual machine" Infrahub API endpoint.
-
Once the volume is attached to your virtual machine, you can proceed to move or copy the data from the ephemeral disk to the shared storage volume, saving your data.
-
With the data now saved on the volume, you can modify the state of the virtual machine without the risk of data loss.
Why am I being charged for a VM in SHUTOFF state?
SHUTOFF state?When you stop a virtual machine to transition it into a SHUTOFF state, billing continues as the resources it utilizes remain exclusively reserved for you.
To stop billing costs, make sure the virtual machine is either HIBERNATED or deleted.
You won't incur charges for transition states like HIBERNATING or RESTORING, and there are no charges for a VM in the ERROR state resulting from failed operations.
Q: How to change the state of your virtual machines within Hyperstack:
In Hyperstack, you can change the state of your virtual machines using these steps:
-
Go to the details page of the VM you want to modify as illustrated below, and hover your cursor over the "More Options V" dropdown in the top right corner of the window to see the VM state-changing actions available for execution on the virtual machine.
-
Select the VM state-changing action based on your needs.
- Stop - Transitions your virtual machine into a
SHUTOFFstate. - Hard Reboot - Restarts the operating system and all its running programs.
- Hibernate this VM - Transitions your virtual machine into a
HIBERNATEDstate. - Delete - Permanently deletes a virtual machine.
The transition of your virtual machine to the new state might take some time.
Changing VM state using the Infrahub API:
The Infrahub API can be used to HIBERNATE or DELETE your virtual machine, refer to the instructions available here.
To avoid data loss, before modifying your virtual machines (hibernate, resize, or delete), back up the data from the temporary storage of the current session, known as the ephemeral disk, to one or more Shared Storage Volumes (SSVs). See the instructions below:
How to save your workload data to an SSV
VM data can be stored by utilizing Shared Storage volumes (SSVs).
-
Create a volume either through Hyperstack, or by using the Infrahub API's "Create volume" endpoint.
-
Attach and mount the volume to your virtual machine, achieved either through Hyperstack or by using the "Attach volumes to virtual machine" Infrahub API endpoint.
-
Once the volume is attached to your virtual machine, you can proceed to move or copy the data from the ephemeral disk to the shared storage volume, saving your data.
-
With the data now saved on the volume, you can modify the state of the virtual machine without the risk of data loss.
References:
I shutdown a virtual machine manually, but the current state is not accurately reflected in Hyperstack.
The use of the VM "Shutdown now" option is currently resulting in this unintended behavior. The VM was expected to shut down and update the Dashboard with its new status, but this communication did not occur. Consequently, it became stuck in the "stopping" state even though it was already shut off. To resolve this, we manually update the status on your dashboard to accurately reflect the current state.
Please reach out to support for assistance at .
We are actively working towards a resolution for this issue.
References:
My VM has been stuck on CREATING or BUILD for a long time. What do I do?
CREATING or BUILD for a long time. What do I do?CREATING and BUILD are normal provisioning states. CREATING means your request has been accepted; BUILD means the VM is being assembled with the configuration you specified. Neither state incurs charges.
If the VM enters an ERROR state, the provisioning attempt failed. The ERROR state also does not incur charges. Delete the VM and try again. Before retrying, check the Events tab on the VM details page for any error messages that indicate the cause.
If the VM stays in CREATING or BUILD for an unusually long time, contact support at [email protected].
Large, high-performance flavors such as the 8xH100 may take several minutes longer to provision than smaller flavors.
References:
When should I hibernate, stop, or delete my VM to reduce costs?
| Action | Resulting state | What is billed | When to use |
|---|---|---|---|
| Stop | SHUTOFF | Full rate continues; all hardware resources remain reserved | When you need a guaranteed, immediate restart. Hardware stays reserved, so the VM restarts instantly without waiting for flavor availability |
| Hibernate | HIBERNATED | Root disk storage only (~$0.07/GB/month); public IP if retained | Pausing for hours or days; cost savings matter more than instant restore |
| Delete | DELETED | Nothing | Done with the VM permanently |
Hibernation caveats:
- Hardware resources are not reserved during hibernation. Restoring requires the same flavor to be in stock at the time you restore. If the flavor is unavailable, you cannot restore until stock returns.
- Detach any Shared Storage Volumes before hibernating. An attached volume enters
RESERVEDstate when its VM is hibernated and continues to bill. See Attached Volumes During Hibernation. - Some flavor types do not support hibernation.
For step-by-step hibernation instructions, see Virtual Machine Hibernation.
References:
I have no running VMs but my balance is still decreasing. What is still being billed?
Virtual machines are not the only billable resources. The following can accrue charges independently of any running VM:
Shared Storage Volumes bill at $0.000096774 per GB per hour (approximately $0.07/GB/month) in all active states, including when not attached to any VM. Navigate to the Volumes page in Hyperstack. Any volume in an AVAILABLE, IN-USE, or RESERVED state is billed. Delete volumes you no longer need to stop the charges.
Volumes can enter RESERVED state when a VM is deleted while a volume is still attached, or when a VM is hibernated without first detaching its volumes. In RESERVED state the volume's data is preserved and billing continues. To free a reserved volume, see Reserved Volumes.
Snapshots bill based on the storage they consume, using the same Cloud-SSD rate as volumes. Billing begins when the snapshot is created and continues until it is deleted. Navigate to the Billing page and select Resource Activity to see a breakdown by snapshot.
Also check for stopped VMs. A VM in SHUTOFF state still bills at the full rate because its hardware resources remain reserved. To stop billing on a stopped VM, hibernate or delete it. See Why am I being charged for a VM in SHUTOFF state?
References:
My VM won't restore from hibernation. I'm getting a stock unavailability error. What should I do?
When a VM is hibernated, its hardware resources including the flavor are released and not reserved. Restoring requires the same flavor to be available in stock at the time you trigger the restore. If the flavor is not in stock, you cannot restore until availability returns.
To check current GPU stock, use the Retrieve GPU Stock API, which returns real-time availability data.
While waiting for stock to return:
- Retry the restore once the flavor becomes available.
- Contact support at [email protected] if the situation is urgent.
Your VM's root disk data is preserved during hibernation and is not lost while you wait. Hardware is not billed while the VM is hibernated; only root disk storage and any retained public IP continue to bill.
References:
My VM has been in RESTORING state for an unusually long time. What should I do?
RESTORING state for an unusually long time. What should I do?RESTORING is the normal transition state between HIBERNATED and ACTIVE. It does not incur charges.
If the VM stays in RESTORING for an unusually long time, contact support at [email protected] with your VM name and ID.
References:
Storage & Volumes
How can I transfer data between virtual machines?
In the potential solutions listed below, make sure that the VM you plan to transfer data to is located in the same environment as the VM you are transferring data from. This is important because data transfer is restricted to virtual machines within the same environment.
It's important to note that a volume can only be attached to a single virtual machine at a time due to the lack of support for parallel access to a single disk by most operating systems and file systems.
Possible solutions:
Volume attachment
VM data can be stored and transferred by utilizing one or more Shared Storage volumes (SSVs).
-
Create a volume either through Hyperstack, or by using the Infrahub API's "Create volume" endpoint.
-
Attach and mount the volume to your virtual machine, achieved either through Hyperstack or by using the "Attach volumes to virtual machine" Infrahub API endpoint.
-
Once the volume is attached to your virtual machine, you can proceed to move or copy the data from the ephemeral disk to the SSV, saving your data.
-
After the volume has successfully stored the data from the ephemeral disk, you can detach it from the virtual machine.
-
Finally, you can now attach this volume to any new VM within the same environment for data transfer.
Bootable volumes
In cases where you wish to maintain the same operating system on the VM you are transferring data to, we recommend creating a bootable volume which is an SSV with an operating system image installed.
Data transfer tools
Create the new virtual machine that you wish to transfer files to in the same environment as your existing VM, and transfer your data through Secure Shell - Secure Copy Protocol (SSH-SCP), Rsync, Network File System (NFS) or any other similar tool.
References:
How can I change the specifications of my virtual machine without losing its data/configurations?
Solutions:
If the virtual machine you want to modify was created from a bootable volume:
- The VM created from a bootable volume can be deleted without losing its data since the data is stored on the volume. Subsequently, you can create a new virtual machine from the existing bootable volume by specifying the volume's name in the
volume_namefield during VM creation or the Hyperstack UI. This allows the new VM to access the saved data on the volume and use its operating system, offering a way to change the VM's specifications without losing its data. Note that a bootable volume can only be attached to a single virtual machine at a time due to the limited support for parallel access to a single disk by most operating systems and file systems.
If the virtual machine was NOT created from a bootable volume:
-
Create a new bootable volume. See instructions on how to create a new bootable volume.
-
The new bootable volume must be attached to the virtual machine containing the custom data you wish to save. See volume attachment details.
-
Once the bootable volume is attached, the VM can be deleted as the data is stored on the volume.
-
Create a new VM with your desired specifications (flavor) from the bootable volume that contains the saved custom data.
References:
Can I attach a single volume to multiple virtual machines?
A volume can only be attached to a single virtual machine at a time due to the lack of support for parallel access to a single disk by most operating systems and file systems.
However, NFS sharing can be used to share a single volume between multiple virtual machines.
Follow these steps:
-
Create a bootable volume with sufficient storage capacity for all your data.
-
Create a CPU-only virtual machine configuration from the volume in step 1 to serve as an NFS server.
-
Use a cloud-init script to install packages and enable NFS sharing.
Click here to see an example NFS server cloud-init script.
Note: "
/data/nfshare" and "*(rw,no_root_squash)" should be edited according to the required behavior.yamlNFS server script#cloud-config
packages:
- nfs-kernel-server
package_update: true
runcmd:
- mkdir -p /data/nfshare
- echo "/data/nfshare *(rw,no_root_squash)" >> /etc/exports
- exportfs -ravsClick here to see an example NFS client cloud-init script.
Note: "
10.0.0.128:/data/nfshare" and "/mnt" must be changed according to the required behavior.yamlNFS client script#cloud-config
packages:
- nfs-common
package_update: true
mounts:
- [ "10.0.0.128:/data/nfshare", "/mnt", "nfs", "defaults", "0","0" ]
runcmd:
- mount /mnt -
Create a firewall rule to permit traffic to port 2049/TCP on your local subnet (eg: 10.1.1.0/24).
-
Create one or more VMs with your desired configurations and attach the cloud-init NFS clients example script.
-
Optionally, the client configurations can be saved as a Provisioning Profile for future usage.
References:
How can I save my virtual machines, similar to the process of creating an AWS machine image?
Hyperstack supports VM snapshots. A snapshot captures the VM's system disk at a point in time and can be used to restore the VM to that state. See VM Snapshots for full instructions.
Additional options for preserving VM configuration:
- Save a Provisioning Profile to reuse your VM's settings and cloud-init script for future deployments.
- Attach a volume for persistent data storage. Note that a volume can only be attached to one VM at a time.
References:
What is a bootable volume?
A bootable volume is a Shared Storage Volume (SSV) with an operating system image pre-installed. If a virtual machine is created from a bootable volume, it can access the data saved on the volume and use its operating system. It's important to note that a bootable volume can only be attached to a single virtual machine at a time due to the lack of support for parallel access to a single disk by most operating systems and file systems.
To learn more about bootable volumes and see guides on creating them, click here.
References:
Can I change the GPU type or flavor of an existing VM?
You cannot change the flavor of a VM in place. To move a workload to a different flavor, use the snapshot-and-redeploy workflow:
-
Back up any data on the VM's ephemeral disk to a Shared Storage Volume before you start. Ephemeral data is not included in a snapshot and will be lost if not saved separately.
-
Create a snapshot of the existing VM.
-
Convert the snapshot to a custom image.
-
Deploy a new VM using the custom image and the target flavor.
The new VM starts with the same disk state as the original, including the operating system, installed software, and configuration. For the complete step-by-step guide, see Change the Flavor of a Virtual Machine.
References:
I attached a volume to my VM but it is not visible in the operating system.
Attaching a volume in Hyperstack makes the block device available to the VM (/dev/vdb), but the operating system does not mount it automatically. Before the volume appears as usable storage, you need to format and mount it.
Confirm the volume is attached:
On the VM's details page in My Virtual Machines, open the Volumes tab and verify the volume status is ATTACHED. If it shows AVAILABLE, click Attach Volume to attach it first.
Mount the volume inside the VM:
Running mkfs on a volume that already contains data erases it permanently. Skip the format step if the volume has been used before.
Execute the following commands:
sudo mkfs.ext4 /dev/vdb                  # format (skip if volume already has data)
sudo mkdir -p /mnt/[volume-name]         # create the mount point
sudo mount /dev/vdb /mnt/[volume-name]   # mount the volume
By default, this mount does not persist after a VM reboot or restore. To remount automatically on boot, add the volume to /etc/fstab. See Mounting a Volume to a Virtual Machine for the full procedure including persistence setup.
References:
My volume is in RESERVED state. How do I stop the charges or recover it?
RESERVED state. How do I stop the charges or recover it?A volume enters RESERVED state when the VM it was attached to is hibernated or deleted while the volume was still attached. The volume's data is preserved in storage and billing continues at the standard rate.
To stop billing: delete the volume
If you no longer need the data, delete the volume directly from the Volumes page: open the volume's Actions menu (⋮) and click Delete. Deleting the volume permanently destroys its data and cannot be undone.
To recover the volume for reuse:
The path depends on the state of the source VM:
- Source VM is hibernated: Restore the VM to
ACTIVE, then open its Volumes tab and detach the volume. Once detached, it returns toAVAILABLE. - Source VM is deleted or cannot be restored: Contact support at [email protected] with the volume name, ID, and region. Do not delete the volume until you have recovered the data you need.
See Reserved Volumes for the full procedure.
References:
My volume is in ERROR state and I cannot attach it.
ERROR state and I cannot attach it.ERROR means the last operation on the volume failed. Volumes in this state are not billed and cannot be attached.
To resolve it:
- On the Volumes page, open the volume's Actions menu (⋮) and click Delete.
- Create a replacement volume. See Creating a Volume for instructions.
Contact support at [email protected] with the volume name, ID, and region if any of the following apply:
- You need to recover data from the volume before deleting it.
- The Delete option is unavailable.
- The volume remains in
ERRORafter deletion.
References:
Drivers & GPUs
How do I choose the right VM configuration?
A flavor is a preset combination of GPU, CPU cores, RAM, and disk. Choose based on your workload:
- GPU workloads (AI/ML training, inference, rendering, simulation): select a GPU flavor matching the GPU type and count your workload requires. See GPU flavor configurations.
- CPU-only workloads (web hosting, network services, database servers): CPU-only flavors are available in CANADA-1 and NORWAY-1. See CPU-only flavors.
Not all flavors are available in every region. See flavor configurations by GPU model and use the region filter to check availability by region.
References:
Can I deploy a CPU-only VM with no GPU?
Yes. Hyperstack offers CPU-only flavors that include no GPU, suited to workloads such as web hosting, network services, and database servers. CPU-only flavors are available in the CANADA-1 and NORWAY-1 regions.
To deploy one, on the Deploy New Virtual Machine page, select a CPU-only flavor in the flavor picker, then complete the rest of the deployment as you would for a GPU VM.
References:
How do I check which GPU flavors are currently available?
GPU availability is real-time and varies by region.
- Hyperstack
- API
On the Deploy Virtual Machine page, select a region and the flavor picker shows only the flavors currently in stock. Out-of-stock flavors are greyed out.
Send a GET request to /core/stocks to retrieve current inventory by GPU model and region, including configuration counts (1x, 2x, 4x, 8x, 10x).
curl -X GET "https://infrahub-api.nexgencloud.com/v1/core/stocks" \
  -H "accept: application/json" \
  -H "api_key: YOUR API KEY"
References:
What operating system images are available?
Hyperstack provides the following OS images for new VMs:
- Ubuntu Server 22.04 LTS and 24.04 LTS with NVIDIA drivers and CUDA pre-installed (R535/CUDA 12.2, R550/CUDA 12.4, R570/CUDA 12.8), with or without Docker. Vanilla Ubuntu images without drivers are also available.
- AlmaLinux 9 Plain and Debian 12 Plain: lightweight images without GPU drivers, suited for general-purpose workloads.
The default image for new deployments is Server 22.04 LTS R535 CUDA 12.2, which is CUDA-ready out of the box.
Reference:
How do I choose or change the OS image when deploying a VM?
When you deploy a VM, the default image Server 22.04 LTS R535 CUDA 12.2 is pre-selected in the Select OS Image section. It comes CUDA-ready, so no additional driver or toolkit setup is needed.
To use a different operating system or CUDA version, select another image in the Select OS Image section on the Deploy New Virtual Machine page before you deploy.
For the full list of available images, see Operating System Images. To match a CUDA version to the right driver, see What are the Nvidia and CUDA driver requirements for my virtual machine?.
References:
Is Windows available as a virtual machine OS?
Windows is not supported as a VM operating system. The supported OS images are:
- Ubuntu Server 22.04 LTS and 24.04 LTS: available with NVIDIA drivers and CUDA pre-installed, with or without Docker, and as vanilla images without drivers.
- AlmaLinux 9 Plain and Debian 12 Plain: lightweight images without GPU drivers.
See Operating System Images for the full list.
What are the Nvidia and CUDA driver requirements for my virtual machine?
GPU compatibility on Hyperstack is determined by the relationship between CUDA versions and driver versions, not by the GPU model itself. Each CUDA version requires a minimum driver version to function correctly, and using an incompatible combination can result in features failing or the GPU not being detected.
Two practical rules:
- Drivers are backward compatible, so newer drivers support older CUDA versions.
- The CUDA version you plan to use defines the minimum driver version required.
In other words, selecting the correct driver starts with choosing your target CUDA version.
Hyperstack provides pre-configured VM images with validated NVIDIA drivers and CUDA versions, and we strongly recommend using these images instead of installing drivers and CUDA manually. See the full list at Driver/CUDA pre-installed images.
Available pre-configured images:
- Ubuntu 22.04 with R535 and CUDA 12.2
- Ubuntu 22.04 with R550 and CUDA 12.4
- Ubuntu 22.04 with R570 and CUDA 12.8
- Ubuntu 24.04 with R570 and CUDA 12.8
Variants with Docker pre-installed are also available.
CUDA → driver compatibility:
| CUDA Version | Compatible NVIDIA Driver Versions |
|---|---|
| CUDA 12.x | >= 525 and < 580 |
| CUDA 13.x | >= 580 |
GPU-specific recommendations:
- H100: R535 or newer
- H200: R550 or newer
For the full guide including driver-installation best practices and cloud-init scripts, see GPU Compatibility: Operating Systems, Drivers, and CUDA.
References:
nvidia-smi is returning "NVML: Driver/library version mismatch".
nvidia-smi is returning "NVML: Driver/library version mismatch".Symptoms:
Failed to initialize NVML: driver/library version mismatch
root@instance-1:/var/log/apt# nvidia-smi` `Failed to initialize NVML: Driver/library version mismatch
NVML library version: 535.113
- This is caused by a version mismatch between the NVIDIA GPU driver and the NVML library.
NVRM: API mismatch
NVRM: API mismatch: the client has the version 535.113.01, but
this kernel module has the version 535.104.12.
- API mismatch between the NVIDIA GPU driver and the client.
Cause of issue:
This mismatch is caused by automatic updates installed on a new driver version.
Diagnostic Commands
grep NVRM /var/log/syslog
dpkg -l |egrep "cuda|nvidia" -i
dkms status
- These commands gather information about the NVIDIA drivers, kernel modules, and related packages on the system, helpful for troubleshooting.
Solution:
-
We suggest turning off automatically installed updates. To do this on Ubuntu machines, execute
sudo dpkg-reconfigure unattended-upgradesand choose "no" when prompted. -
Execute the following commands to re-install Nvidia-driver, and libraries, and reboot the instance.
terminalsudo apt purge nvidia* libnvidia*
# Update the version number 535 to the correct version, usually the driver version reported in the logs.
sudo apt install nvidia-driver-535
reboot now -
the
nvidia-smicommand again, it should now work. -
If you receive this error:
NVIDIA-SMI has failed because it couldn't communicate with the NVIDIA driver. Make sure that the latest NVIDIA driver is installed and runningExecute the following commands to re-install CUDA libraries and reboot again.
terminalsudo apt-get update
sudo apt-get -y install cuda
reboot now
The driver should function without problems after boot; verify this with the nvidia-smi command.
How do I monitor GPU utilization for my virtual machine?
To monitor GPU usage for your virtual machine while your workflows are running, execute the nvidia-smi command in the Ubuntu terminal.
References:
Why is my GPU not being detected?
If your GPU is not being detected properly and the nvidia-smi command shows MIG M. as Enabled, it means Multi-Instance GPU (MIG) mode is enabled on your NVIDIA GPU. MIG mode partitions the GPU into smaller, isolated instances, which can cause detection issues with software that doesn't support this mode. Disabling MIG mode will revert the GPU to its full, non-partitioned state, allowing for proper detection and usage.
Follow these steps to disable MIG mode:
-
Open a terminal and run the following command to check the current status of your GPUs and identify the GPU ID (usually starting from 0):
terminalnvidia-smiExample output:
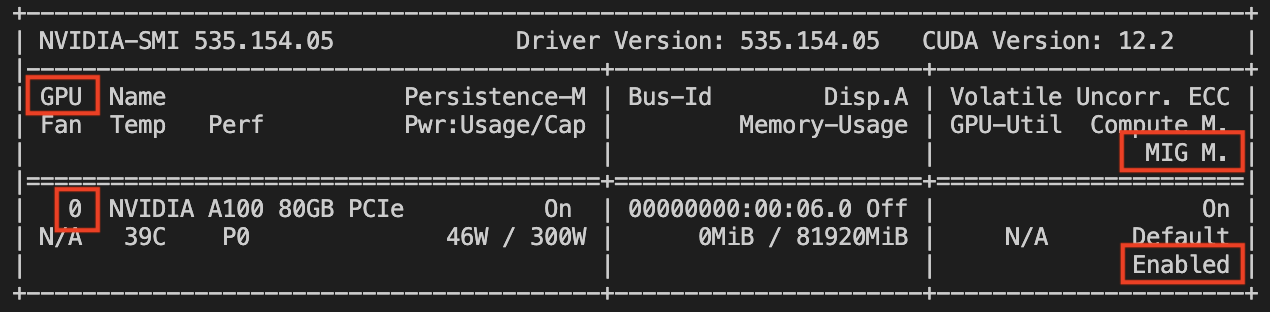
The GPU ID is shown on the left, and MIG mode enabled is indicated on the right.
-
Use the following command to disable MIG mode for the undetected GPU, replacing
<gpu_id>with the GPU's ID:terminalsudo nvidia-smi -i <gpu_id> -mig 0This command uses
sudoto grant superuser permissions,nvidia-smias the NVIDIA System Management Interface command,-i <gpu_id>to specify the GPU ID, and-mig 0to disable MIG mode. -
Run the
nvidia-smicommand again to verify that MIG mode has been disabled:terminalnvidia-smiExample output:
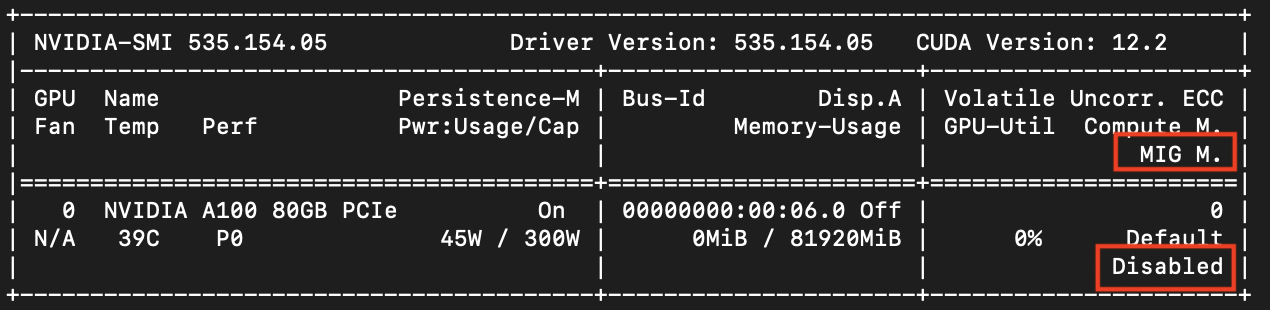
This output indicates that MIG mode has been disabled.
By following these steps, you will disable MIG mode on your NVIDIA GPU, allowing it to be detected properly.
References:
My VM has stuck GPU(s). How can I restore it?
When one or more GPUs within a virtual machine become stuck due to hung processes and the VM is improperly rebooted, it can cause the VM to become unresponsive, leading it to enter an ERROR state. To restore a VM with stuck GPU(s) to a functional state, you must first SHUTOFF the VM to release any hung processes. Once in the SHUTOFF state, you can then issue the start command to reboot the operating system and software stack, thereby restoring the VM.
Follow the instructions below to restore a VM with stuck GPU(s) using the Infrahub API:
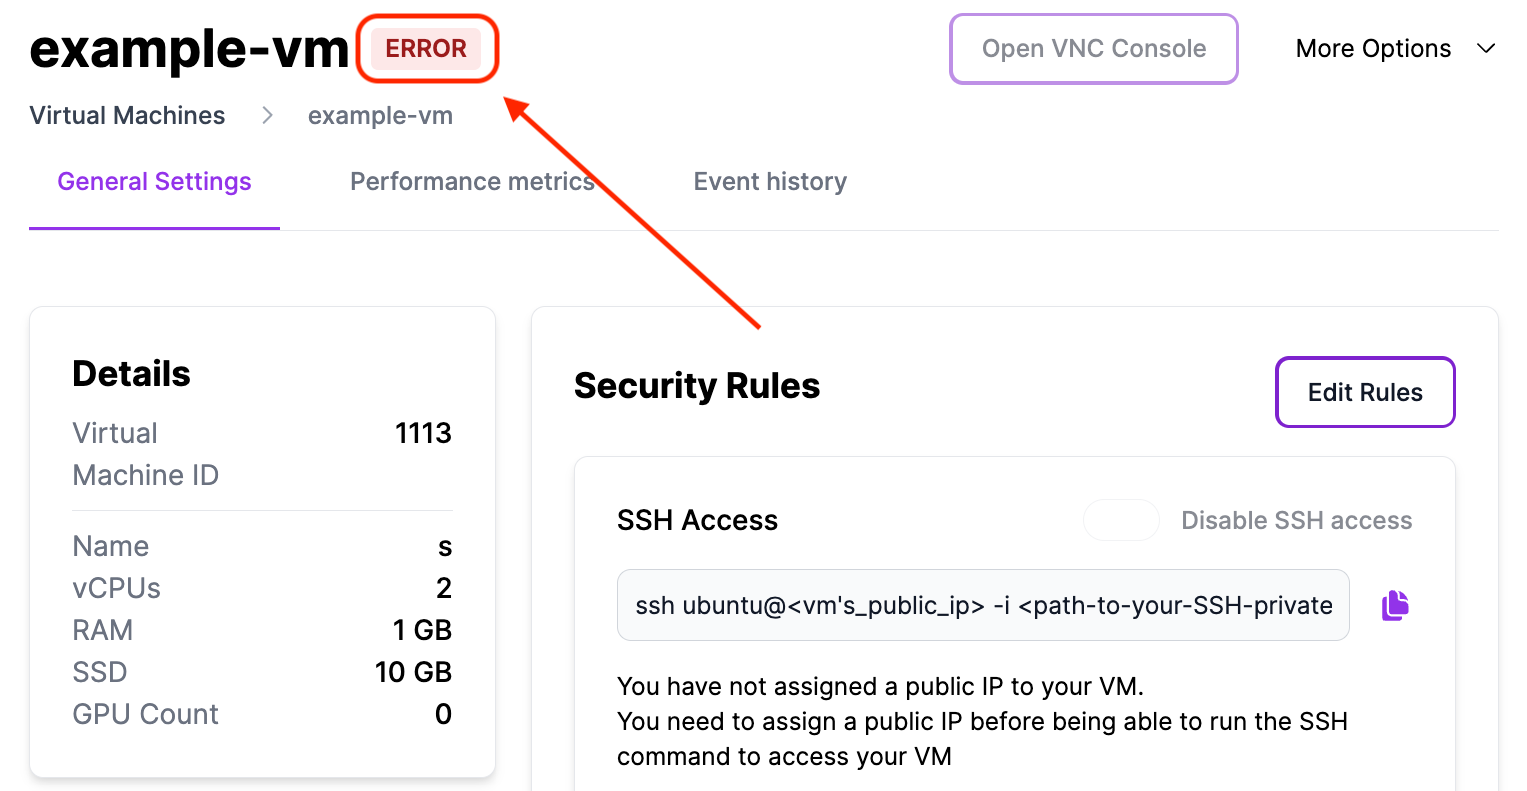
This solution also applies to a VM that is in ERROR state. However, we recommend contacting support in these cases at [email protected].
1. Shutting down the VM
To restore the VM, you'll first need to shut it down to release any hung processes. This can be done by issuing the stop command through the Infrahub API. Simply call the GET /core/virtual-machines/{virtual_machine_id}/stop endpoint and include the virtual machine's ID in the request path.
A successful stop request will return a message indicating that the VM is scheduled to stop.
curl -X GET "https://infrahub-api.nexgencloud.com/v1/core/virtual-machines/{virtual_machine_id}/stop" \
  -H "accept: application/json"\
  -H "api_key: YOUR API KEY"
{
  "status": true,
  "message": "VM example-vm is scheduled to stop."
}
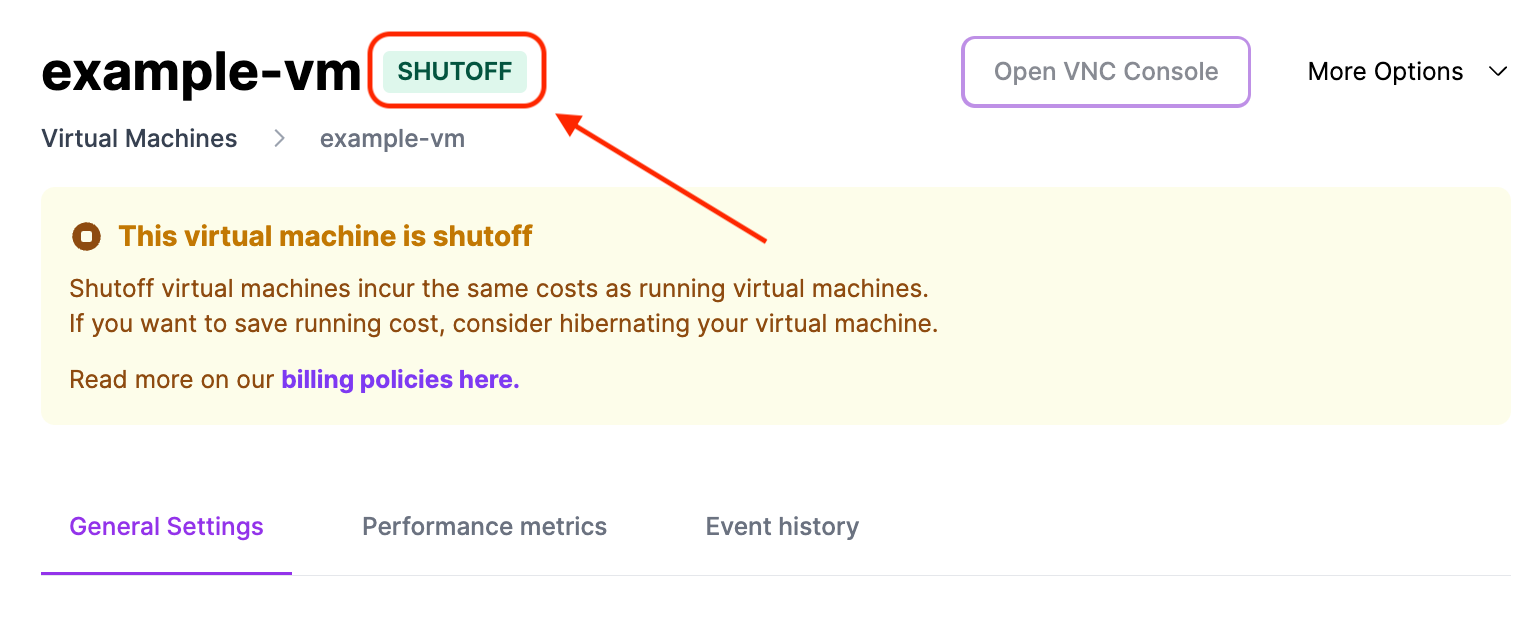
The Hyperstack UI will display the SHUTOFF status when the virtual machine has shut down successfully.
2. Starting the VM
After the virtual machine has been successfully shut down and is in the SHUTOFF state, you can start it by calling the GET /core/virtual-machines/{virtual_machine_id}/start endpoint and providing the virtual machine's ID in the request path.
A successful start request will return a message indicating that the VM is scheduled to start.
curl -X GET "https://infrahub-api.nexgencloud.com/v1/core/virtual-machines/{virtual_machine_id}/start" \
  -H "accept: application/json"\
  -H "api_key: YOUR API KEY"
{
  "status": true,
  "message": "VM example-vm is scheduled to start."
}
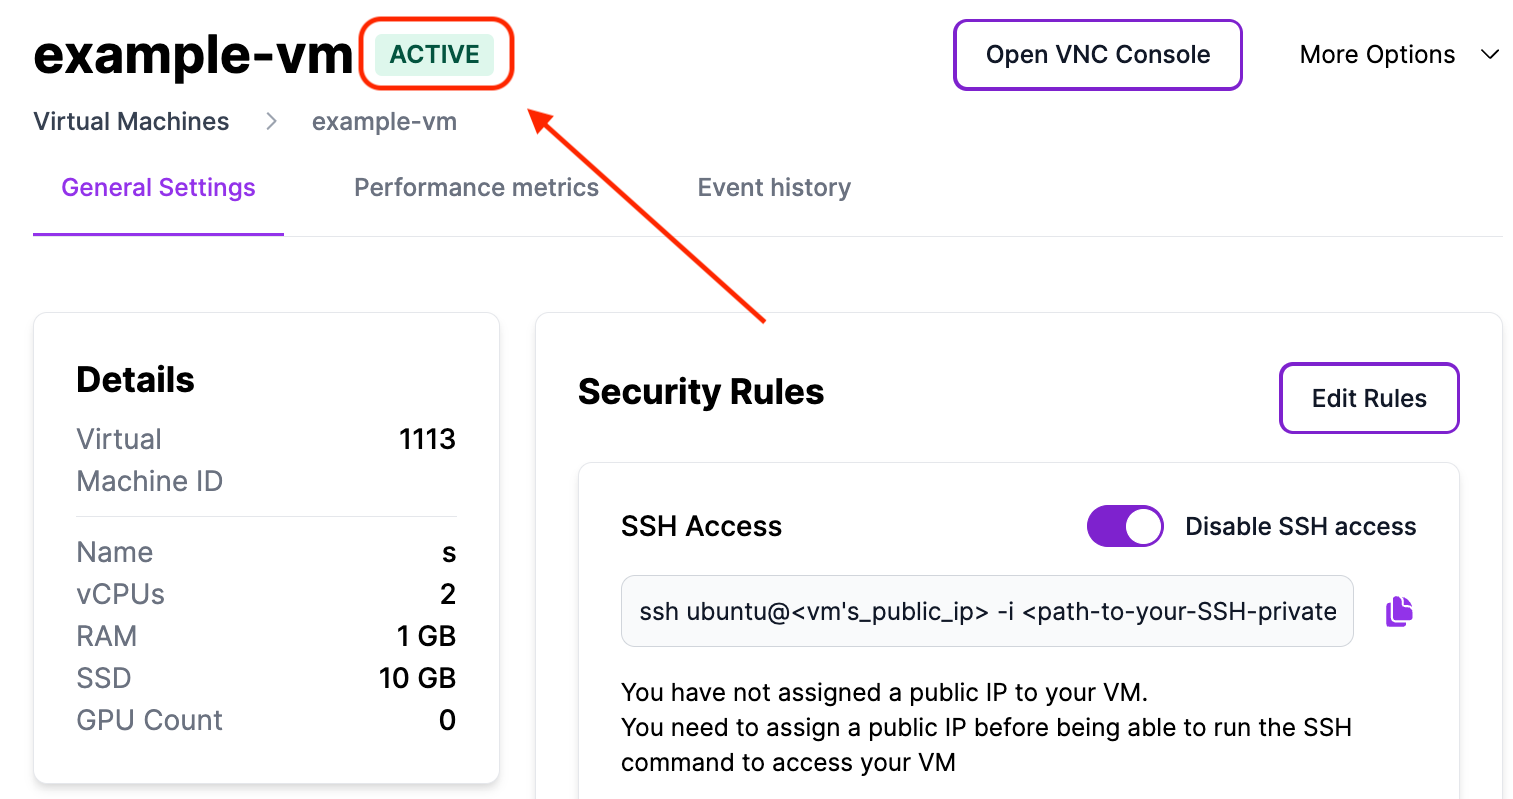
The Hyperstack UI will display the ACTIVE status when the virtual machine has started successfully.
The virtual machine is now restored and it is ready for use.
References:
Networking
How do I create firewall rules for my virtual machine?
To see guides for creating various types of firewalls and firewall rules in Hyperstack, click here.
References:
How can I configure my virtual machine to permit unrestricted incoming and outgoing traffic?
To enable all incoming and outgoing traffic for your virtual machine, configure firewall rules to permit inbound and outbound traffic on all ports and IP addresses.
Firewall rules for your virtual machines can be created using two different methods: the Hyperstack platform and Infrahub API.
Hyperstack - How to create firewall rules to permit unrestricted incoming and outgoing traffic.
These instructions guide you through the process of creating firewall rules that allow all incoming traffic from any port and any IP address to your virtual machine using the Hyperstack platform:
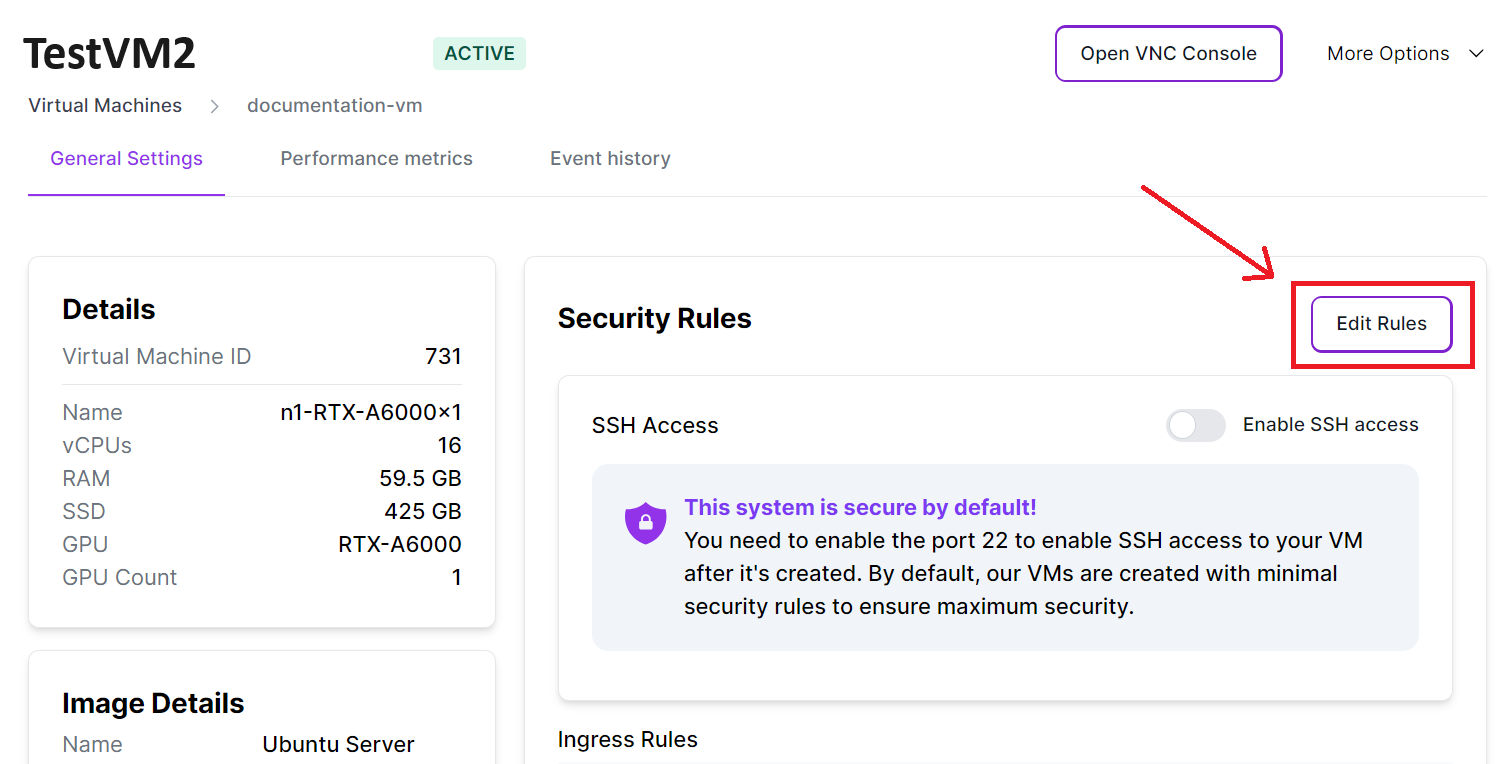
-
Within Hyperstack, click "Edit Rules" in the "Firewall Rules" section of your virtual machine, to manage its firewall rules.
-
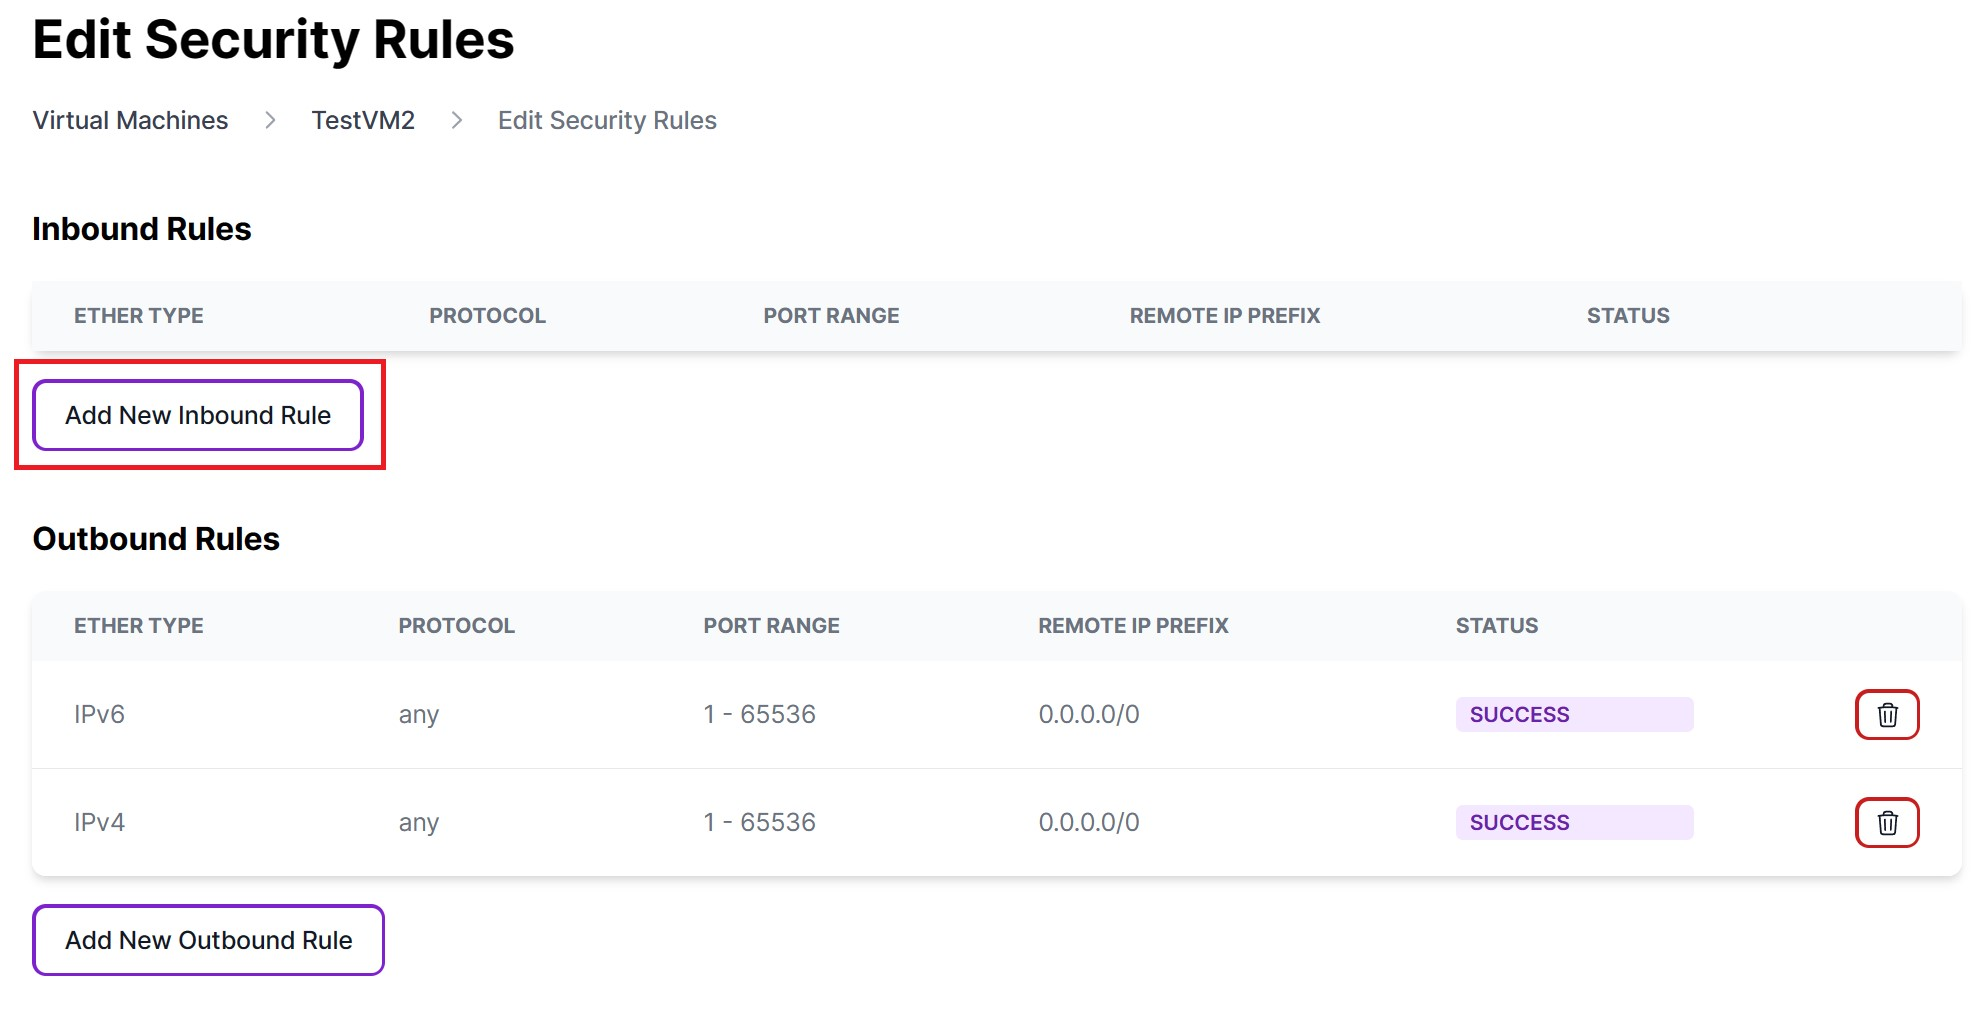
Click "Add New Inbound Rule" to create a firewall rule for incoming traffic.
-
Complete the fields as specified below to enable all incoming traffic on all ports from any IP address.
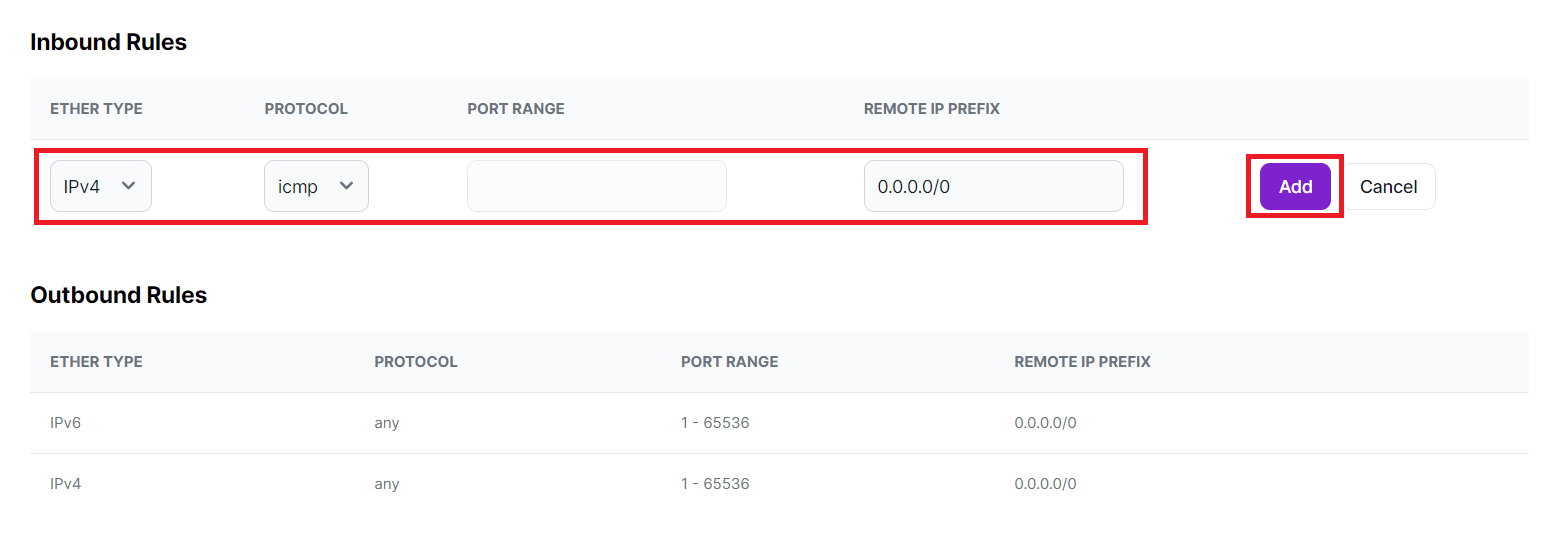
Field Name Field Input ETHER TYPE Leave as default (usually IPv4) PROTOCOL Select "any" (all protocols) PORT RANGE This field is left empty, permitting traffic from all ports. REMOTE IP PREFIX Use "0.0.0.0/0" to allow traffic from any source IP address. -
Click "Add", to create a firewall rule enabling all incoming traffic.
-
Now that you've created a firewall rule allowing all incoming traffic, follow the same steps to establish a rule for outgoing traffic. Click "Add New Outbound Rule" to configure a firewall rule for outgoing traffic.
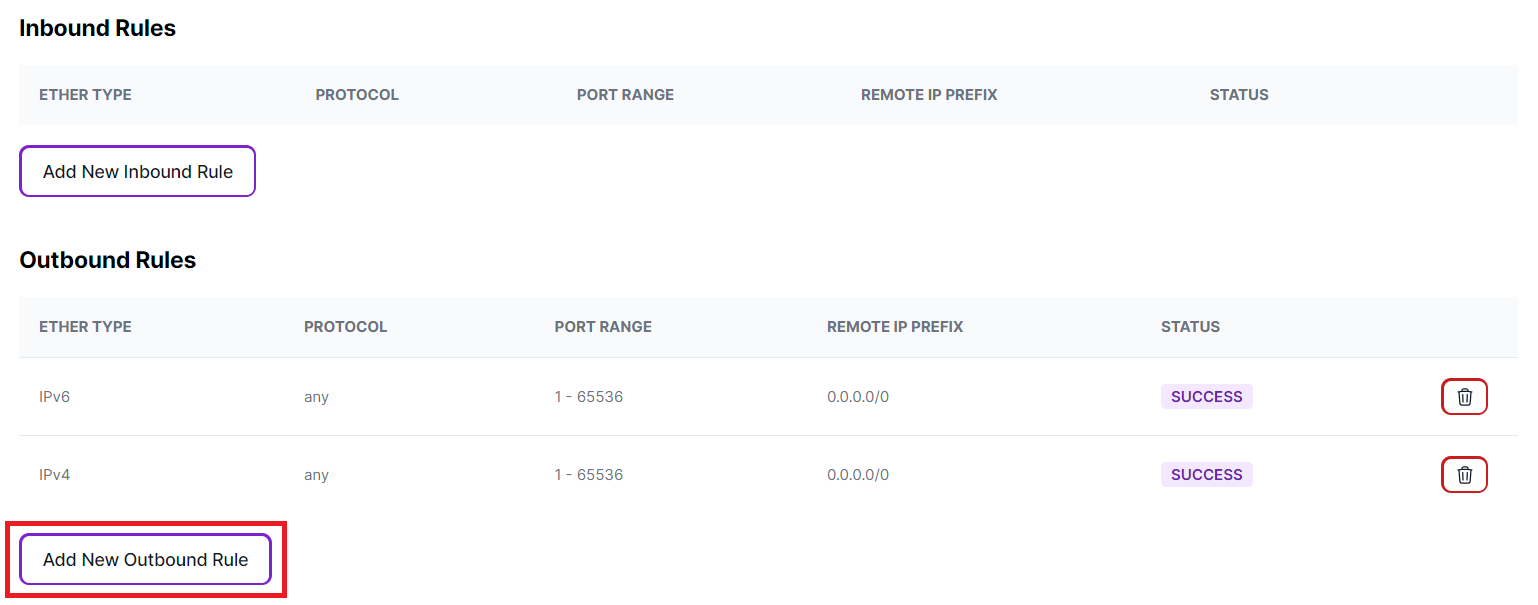
-
Complete the fields as specified below to enable all outgoing traffic on all ports to any IP address.
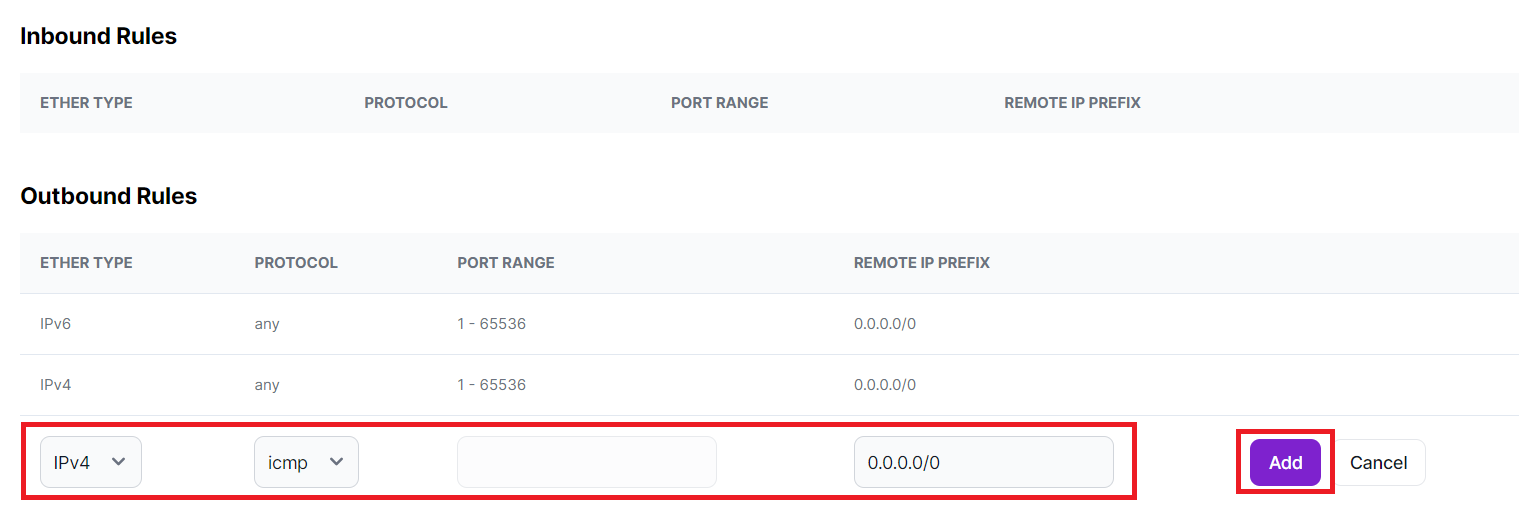
Field Name Field Input ETHER TYPE Leave as default (usually IPv4) PROTOCOL Select "any" (all protocols) PORT RANGE This field is left empty, permitting traffic to all ports. REMOTE IP PREFIX Use "0.0.0.0/0" to allow traffic to any IP address. -
Your inbound and outbound firewall rules should appear as follows:
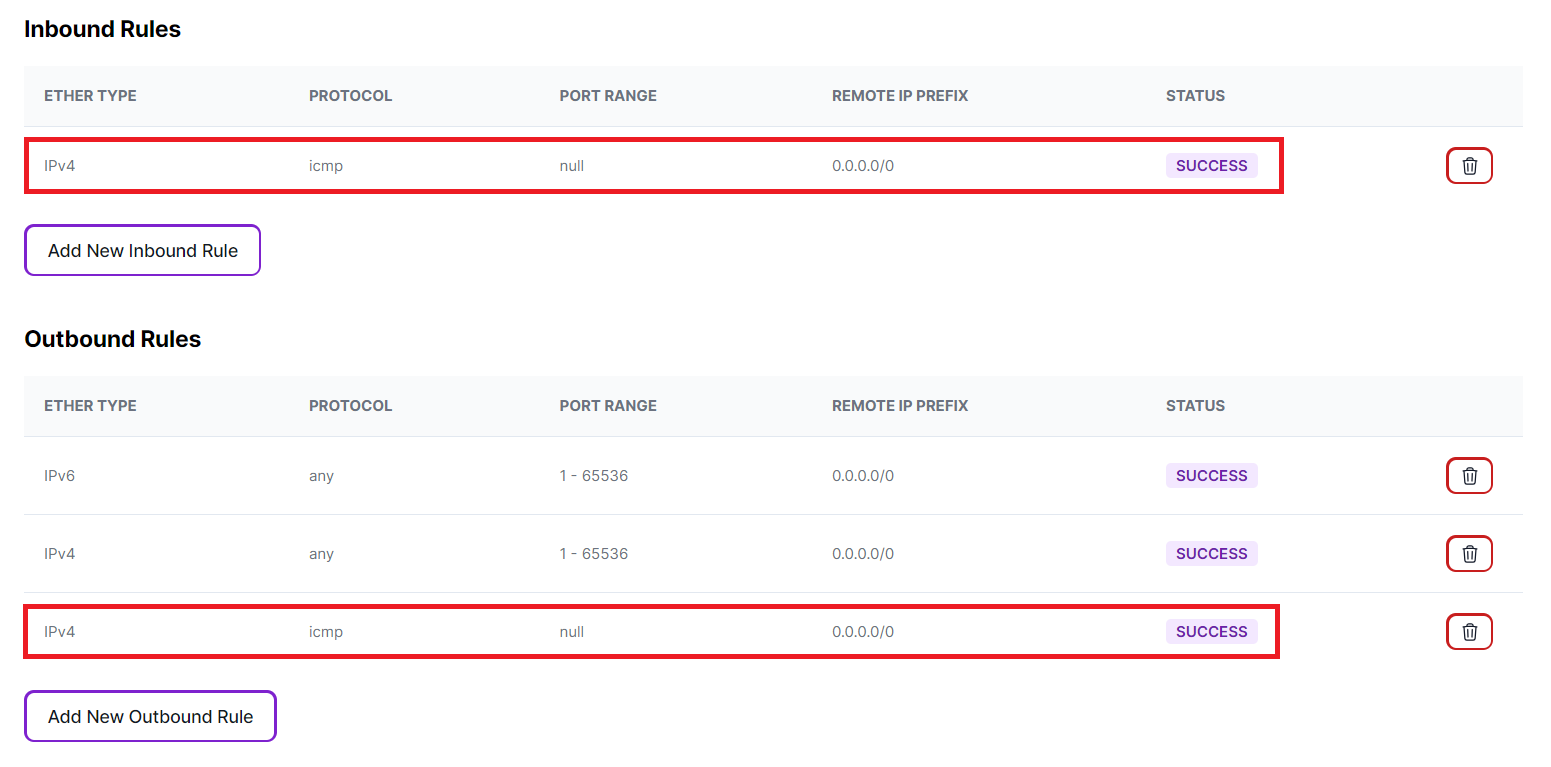
Congratulations! Your virtual machine is now configured to allow all incoming traffic on all ports from any IP address and all outgoing traffic on all ports to any IP address.
Infrahub API - How to create firewall rules to permit unrestricted incoming and outgoing traffic.
These instructions walk you through the process of creating firewall rules that allow all incoming and outgoing traffic from any port and any IP address to your virtual machine using the Infrahub API.
1. Create an inbound rule via the Infrahub API
Path parameters
Include the integer ID of the virtual machine that this firewall rule is being attached to in the path of the request as follows: core/virtual-machines/{VM ID HERE}/sg-rules
Request body parameters
Complete the request body with the following fields and values.
| Field Name | Field Input |
|---|---|
direction | "ingress" to designate that the firewall rule is for incoming traffic. |
protocol | "any" (all protocols). |
ethertype | "IPv4". |
remote_ip_prefix | Use "0.0.0.0/0" to allow traffic from any source IP address. |
curl -X POST "https://infrahub-api.nexgencloud.com/v1/core/virtual-machines/123/sg-rules" \
-H "accept: application/json"\
-H "content-type: application/json" \
-H "api_key: YOUR API KEY" \
-d '{
  "direction": "ingress",
  "protocol": "any",
  "ethertype": "IPv4",
  "remote_ip_prefix": "0.0.0.0/0"
}'
To authenticate Infrahub API requests, add an authorization header to your API request that contains an API Key as follows:
-H "api_key: YOUR API KEY"
Returns
Returns the status of the firewall rule creation operation, along with the configuration details that were specified in the request body.
This response indicates the successful addition of a firewall rule that will permit all incoming traffic (ingress) on all ports and protocols from any IP address, for the virtual machine with the ID "123".
{
  "status": true,
  "message": "Security Rule created successfully",
  "security_rule": {
    "id": 2296,
    "direction": "ingress",
    "protocol": "any",
    "port_range_min": null,
    "port_range_max": null,
    "ethertype": "IPv4",
    "remote_ip_prefix": "0.0.0.0/0",
    "status": "pending",
    "created_at": "2023-11-24T19:59:01"
  }
}
2. Create an outbound rule via the Infrahub API
Path parameters
Include the integer ID of the virtual machine that this firewall rule is being attached to in the path of the request as follows: /core/virtual-machines/{VM ID HERE}/sg-rules
Request body parameters
Complete the request body with the following fields and values.
| Field Name | Field Input |
|---|---|
direction | "egress" to designate that the firewall rule is for outgoing traffic. |
protocol | "any" (all protocols). |
ethertype | "IPv4". |
remote_ip_prefix | Use "0.0.0.0/0" to allow traffic to any IP address. |
curl -X POST "https://infrahub-api.nexgencloud.com/v1/core/virtual-machines/123/sg-rules" \
-H "accept: application/json"\
-H "content-type: application/json" \
-H "api_key: YOUR API KEY" \
-d '{
  "direction": "egress",
  "protocol": "any",
  "ethertype": "IPv4",
  "remote_ip_prefix": "0.0.0.0/0"
}'
Returns
Returns the status of the firewall rule creation operation, along with the configuration details that were specified in the request body.
This response indicates the successful addition of a firewall rule that will permit all outgoing traffic (egress) on all ports and protocols to any IP address, for the virtual machine with the ID "123".
{
  "status": true,
  "message": "Security Rule created successfully",
  "security_rule": {
    "id": 2297,
    "direction": "egress",
    "protocol": "any",
    "port_range_min": null,
    "port_range_max": null,
    "ethertype": "IPv4",
    "remote_ip_prefix": "0.0.0.0/0",
    "status": "pending",
    "created_at": "2023-11-24T20:33:46"
  }
}
Congratulations! Your virtual machine is now configured to allow all incoming traffic on all ports from any IP address and all outgoing traffic on all ports to any IP address.
Keep in mind that allowing all traffic might pose firewall risks, so use this configuration carefully and consider the specific requirements of your use case.
References:
What is the maximum number of packets allowed for communication between VMs?
The packet limit for inter-VM communication within virtualized environments is 800,000 packets. Exceeding this threshold will result in the affected VM automatically shutting down. This limit is important for maintaining optimized network performance, security, and resource allocation in virtualized environments.
I'm experiencing complete packet loss when attempting to ping the public IP of a virtual machine.
ICMP (ping) traffic is blocked by default. To allow ping, create a firewall rule that permits incoming ICMP traffic:
- In My Virtual Machines, click the VM name to open its details page.
- Navigate to the Firewall tab and click Add Rule.
- Set the protocol to ICMP, direction to Ingress, and remote IP prefix to
0.0.0.0/0. - Save the rule.
References:
Account & Team
How do I invite a team member to my organization?
- Navigate to My Organization under Manage in the left sidebar.
- Click Invite user to join organization.
- Enter the team member's email address and click Send invite.
The recipient receives an email with a signup link. After they log in or create a Hyperstack account using that link, they appear as a member of your organization.
New members have no permissions by default. Until you assign a user role, they cannot view or manage any resources. See I invited someone but they can't see any resources.
References:
I invited someone to my organization but they can't see any VMs or resources. What's wrong?
New members are added with no permissions by default. They cannot view or manage any resources until you assign them a user role.
To assign a role:
- Navigate to My Organization under Manage in the left sidebar.
- Under the Roles header, click ⋮ next to the member.
- Select the desired role and click Assign role.
If you have not yet created a user role, use the Create a new User Role button on the same page. See Create a User Role for instructions. The AllPermissions policy grants full access to all resource actions. For more granular control, create a custom role with specific permissions.
References:
Why are the Deploy and Restore buttons disabled, or why is my credit balance showing $0, in an organization I joined?
Your user role is missing the billing permissions that let you read the organization's credit balance. Hyperstack checks that balance before it lets you deploy or restore a virtual machine. When you can't read it, the balance shows as $0 and the Deploy and Restore buttons stay disabled, even when the organization has credit.
Ask your organization owner to add billing:credit-view and billing:view to your user role. The built-in VirtualMachinePermissions policy covers virtual machine actions only, so these billing permissions must be added separately.
References:
Data Centers
What regions are available and where are they located?
Hyperstack offers three regions:
| Region | Location |
|---|---|
| CANADA-1 | Quebec, Canada |
| NORWAY-1 | Vestland, Norway |
| US-1 | Texas, United States |
Not all flavors are available in every region. See flavor configurations by GPU model and use the region filter to check availability by region.
Reference:
Is there a data center in Europe?
Yes. Hyperstack operates NORWAY-1 in Vestland, Norway. It is a sustainably powered region running on 100% renewable energy. For details on certifications, see data center certifications.
Reference:
Do any regions run on renewable energy?
NORWAY-1 (Vestland, Norway) and CANADA-1 (Quebec, Canada) are sustainably powered regions operating on 100% renewable energy. US-1 (Texas, United States) runs on standard energy.
Reference:
What is the relationship between data centers, regions, and environments?
These three concepts form a hierarchy:
- A data center is the physical facility that hosts the hardware. Each Hyperstack region is backed by one dedicated data center.
- A region represents a distinct geographic location (such as
CANADA-1orNORWAY-1). Regions are isolated from each other, so a failure in one region does not affect others. - An environment is a resource container you create within a region. It groups your VMs, volumes, and SSH key pairs together for organization and management. You can create multiple environments within the same region or across different regions.
When you deploy a VM, you choose a region first, then an environment within that region.
References:
What certifications do NexGen Cloud data centers hold?
NexGen Cloud prioritizes the security and dependability of its infrastructure by housing data in data centers certified as Tier 3. These centers adhere to stringent guidelines for power redundancy, cooling, and system backups. Our data centers are concurrently maintainable, allowing for maintenance without service interruptions and maintaining an uptime of 99.982% annually.
NexGen Cloud has also achieved SOC 2 Type 2, an independent audit of its security controls. Type 2 is the stronger of the two report types: it tests controls for operating effectiveness over a period of time, not just at a point in time. The audit covers the controls that protect your data, including access management, change management, system monitoring, and incident response.
References:
Kubernetes & Clusters
Which regions support Kubernetes clusters?
Kubernetes clusters can be deployed in CANADA-1 and NORWAY-1 only. US-1 does not support cluster deployment.
References:
How do I access the kubeconfig for my cluster?
- Hyperstack
- API
- Navigate to the Kubernetes page in Hyperstack.
- Click the cluster name to open its details page.
- In the Cluster Kubeconfig section, download or copy the kubeconfig file.
The kubeconfig field in the cluster response is base64-encoded. Decode it before use:
echo "<kubeconfig_value>" | base64 --decode > kubeconfig.yaml
export KUBECONFIG=kubeconfig.yaml
Replace <kubeconfig_value> with the value from the Retrieve cluster details response.
References:
Can I hibernate a Kubernetes cluster to pause billing?
Kubernetes clusters cannot be hibernated. To stop billing, delete the cluster.
Worker nodes are billed hourly when their node VMs are ACTIVE. Master, bastion, and load balancer nodes are not billed. Public IPs on bastion and load balancer nodes are billed separately, including for contracted flavors.
References:
How do I upgrade my Kubernetes cluster to a newer version?
In-place version upgrades are not supported. The upgrade path is to deploy a new cluster on the target version, migrate your workloads and data, then delete the old cluster. Because the default csi-hyperstack StorageClass uses reclaimPolicy: Delete, dynamically provisioned volumes are permanently deleted with the old cluster, so data migration must happen before deletion.
See Upgrading your Kubernetes cluster version for the full procedure.